Showing posts with label Cricut Cartridge Create A Critter. Show all posts

Friday, August 2, 2013

Cardz TV Linky Party Go-To Galz Sew Much Fun!


Hi everyone! We’re back from our Summer vacation with some new, fun challenges, linky parties, and a new name! We’ve divided our large Cardz TV Design Team into 2 smaller teams, and we’re now Cardz TV Challenge Go-To Galz, and Cardz TV Linky Party Go-To Galz! We’ll be rotating every other week, so each week on Cardz TV, you’ll have a chance to enter our challenge, or link up to our linky party! We’re really excited about this new format, and hope you’ll play along! As always, we’ll use random.org to pick a winner for each linky party, for Cardz TV Stamps and lots of other fun prizes!
The Cardz TV Go-To Galz have been really creative in choosing their linky party themes, SO…are you ready for some fun?

This is what our Cardz TV Linky Party Go-To Galz have come up with for this week:

Linky Party #1 “Sew Much Fun” 
Create a card, layout or craft using real or faux stitching.

You have until noon EST, Thursday, August 15th, to post your name and a link to your creation, using Inlinkz below at Cardz TV. Many of you have asked, and no, you don't have to use Cardz TV Stamps to link up and enter! The link up winner, picked by random.org, will receive a set of Cardz TV Stamps!

Here is my card:


Finished Card: 4 1/4" x 5 1/2"

Materials:
CardzTV  Stamps Sew Much Fun "You've Got Me In Stitches!"
Cricut Cartridge Create a Critter Bee, page 68 (Base and Layer 1)
Queen and Co Pearls Nightfall, 2 Medium 
Action Wobble

I added some faux stitches on the bee and the green strips. The background paper was just the right match. The bee is on an Action Wobble, however, I can't ever get a photo of it wobbling. 

The awesome Cardz TV Linky Party Go-To Galz have done an amazing job on this link up, and given us some fantastic inspiration! Be sure go by each of their blogs, become a follower, and leave them some comment love! 

Hope you all have fun with this linky party! Good luck everyone...we can't wait to see what you create!

Thanks for stopping by. Please leave me a comment.

imagine what you could do...

Friday, February 8, 2013

CardzTV Stamps Challenge "Kidz Kardz"

We are having some fun with something a little different this week at CardzTV Stamps. The challenge is called "Kidz Kardz". Make a a set of 3 - 3" x 3" Valentines for kids.

Well, I got carried away (what else is new), so I made 3 sets of 3:


The back of each one has the sentiment, "Be My Valentine!":


Actually, I made them into pockets to hold a candy treat:


Finished Pockets: 3" x 3"

Materials:
Cardstock: White, Pink, Purple, Yellow, Black, Red, Green, Tan, Brown, Cream, Blue and Patterned Paper
Cricut Cartridge Create A Critter Frog, page 24; Rabbit, page 26; Squirrel, page 32; Cat 2, page 38; Crab, page 40; Bird 2, page 45; Monkey, page 46; Skunk, page 61 and Bee, page 68 (Various Base, Layer 1, Layer 2, Layer 3, Shift Base, Shift Layer 1and/or Shift Layer 2)
CardzTV with Mary Clear Stamps Be My Valentine, "Be My Valentine!"
Various Embossing Folders: Cuttlebug Heart Block and D'Vine Swirls; Sizzix Scrollmark and Darice Heart
Small Heart Punch
Mounting Tape

I made them fairly simple since I plan on giving them to Gianna's (my 3 1/2 year old granddaughter) preschool class for Valentine's Day. I didn't want any embellishments falling off for tiny hands. I think they turned out cute. (I ended up making another 5 so each of Gianna's classmates and teacher would get one...lol)

Hope you decide to play. Mary will be giving one of her stamp sets away to the winner. Challenge ends the 21st. Good luck.

Thanks for stopping by. Please leave a comment. I love reading your thoughts.

imagine what you could do...

Friday, July 27, 2012

CardzTV with Mary Clear Stamps Challenge "Anything Goes"

If you are looking for the Digi Haven challenge, click here.

Another great Challenge with CardzTV stamps...It's "Anything Goes!" Isn't that fun! The challenge will run through midnight Thursday. The winner will be picked by random.org on Friday and will win one of Mary's wonderful stamp sets.

Here is my card:


Finished Card: 4 1/4" x 5 1/2"

Materials:
Cardstock: White, Black, Red, Brown, Pink and Patterned Paper
Cricut Cartridge Create A Critter Skunk, Page 61 (Base and Layer 1)
CardzTV with Mary Clear Stamps Critter Captions "I'm a Stinker!"
Spellbinder Shapeabilities Large Octagons, Largest and 2nd Largest
Darice Embossing Essentials Plaid
White Sheer Ribbon
Black Pigment Ink
White Gel Pen
Small Pink Pom Pom
Mounting Tape

Now doesn't that sentiment fit perfectly with this little guy? I think so. Figure that I could put something on the inside like "I forgot your birthday!" or "Sorry!" (We'll see what I've been a stinker about...lol).

Hope you check out the projects from the other designers (this is the new design team) and you join the challenge.

Thanks for stopping by. I would love to hear what you think...please leave a comment!

imagine what you could do...

Friday, June 22, 2012

CardzTV Stamps Challenge # 11 "Anything Goes"

If you are looking for the Digi Haven Challenge, click here.


It's challenge time again at CardzTV with Mary Clear Stamps. This time it is "Anything Goes!" Now this opens up so much...and sometimes I think these challenges are so much harder. (I like to have a direction!) Although, I think I did pretty good with this...


Finished Card: 4" x 9"

Materials:
Cardstock: White, Two Shades of Orange, Black and Patterned Paper
Cricut Cartridge Create A Critter Giraffe, page 48 (Base, Layer 1 Base, Layer 2 Base and Accessory Base)
CardzTV with Mary Clear Stamps Critter Captions, "Thanks for stickin' your NECK out!"
StazOn Jet Black Ink
Sugarloaf Whispers Strokes Markers
Mounting Tape

I thought I would make this a TALL card, because of the giraffe (cut at 5 1/2"). I colored the nose (tan), the horns and "mane" (green) with the Sugarloaf Markers. I also used the green marker and colored the outside of the card to match. Although you can't see it, the giraffe is single mounted on the shadow layer. The sign and the sunglasses are also mounted. I thought the CardzTV sentiment was perfect! Mary has so many great stamp sets!

Hope you join the challenge. The winner will receive their choice of one of Mary's stamp sets. So get on over there and check it out!

Thanks for stopping by.

imagine what you could do...


Sunday, May 27, 2012

Invitation

I'm planning a party for June and I made the invitations. There are two variations (background paper is different):


Which one do you like better?

Finished Card: 4 1/4" x 5 1/2"

Materials:
Cardstock: White, Yellow, Red, Blue and Patterned
Cricut Cartridge Create A Critter Elephant (Tent) page 55, (Accessory Base and Shift)
Cricut Design Studio
CardzTV with Mary Clear Stamps Ticket Talk (Ticket)
Fiskars All Year Greetings Clear Stamps "You're Invited"
EK Success Border Punch Scallop Diamond
Spectrum Noir Markers
StazOn Jet Black Ink
Red Pigment Ink
Nicole Ultra Fine Premium Glitter Extra Fine Multi Diamond Dust
Mounting Tape

They are fairly simple invitations and I still feel like they are missing something. However, I needed to get them out, so I left them like this. I stamped the "ticket" on white card stock, colored the outside, stamped the sentiment, then fussy-cut them out.  Of course, all the information for the party is on the inside. Can you guess the theme? Maybe I'll post pictures afterwards...

Have a great rest of the Memorial weekend.

imagine what you could do...


Friday, November 18, 2011

Just My Style

This is my first project as a design team member for CardzTV. I'm so excited. Our first challenge is called "Just My Style". I actually made two cards.

Here's the first one:


Finished Card: 4 1/4" x 5 1/2"

Materials:
Cardstock: White, Turquoise, Three Shades of Brown, Red and Patterned Paper
Cricut Cartridge Create A Critter Reindeer, page 73 (Base, Layer 1 Base, Layer 2 Base and Layer 3 Base)
CardzTV with Mary Clear Stamps Holly Jolly "Have Yourself A Merry Little Christmas"
Red Glitter Glue
Queen and Co Pearls Pearl 8 Small
Le Plume II Marker Brown
Mounting Tape

My second card:


and the inside:


Finished Card: 4 1/4" x 5 1/2"

Materials:
Cardstock: White, Cream, Brown, Yellow, Orange, Pink and Patterned Paper
Cricut Cartridge Everyday Pop-Up Cards Cake 2, page 64 (Base, Layer 1 Base, Layer 1 Shift and Layer 2 Base)
Cuttlebug Embossing Folder D'Vine Swirls
Le Plume II Marker Pink (the candles and cake plate)
Fiskars Clear Stamps Put On Your Party Hat "Happy Birthday"
Queen and Co Pearls Orchid 3 Large and 2 Medium
Mounting Tape
Computer Sentiment (inside)

When I read the challenge, "Just My Style", I thought long and hard about it. I finally concluded that my style is simple. Generally, I like one large image accompanied by a sentiment. My lines are usually straight. I do like embossing folders too. Oh yeah, and 3-D projects. (lol) Now don't get me wrong, I use border punches and glitter too. I guess it just depends on my mood and the project.

Hope you check out all the projects over at CardzTV (and Mary is giving away a new stamp set too).

Leave a comment (I love reading them) and/or become a follower.

Thanks for stopping by....
imagine what you could do....

Sunday, October 9, 2011

Hooo's Birthday Is It? Three Challenges

I thought I would submit this card to three different challenges...Cardz TV - Cricut Cardz Challenge (Owls), The Paper Variety (Forest Friends) and Birthday Sundaes (Fall colors on a Birthday Card).

Here is my card:


(so you can can see the off-center opening)

and the inside:

Finished Card: 4 1/4" x 5 1/2"

Materials:
Cardstock: Ivory, Two Shades of Green, Tan, Two Shades of Brown, Orange/Rust, Orange/Gold and Patterned Paper
Cricut Cartridge Everyday Pop-Up Cards Owl, page 30 (Base, Base Shift, Layer 1 Base, Layer 1
Shift and Layer 2 Shift)
Cricut Cartridge Create-A-Critter Owl, page 25 (Accessory Base and Shift)
Cuttlebug Embossing Folder D'vine Swirls
Fiskars Texture PlateWoodgrain
Green, Charcoal, Ivory and Brown Chalk
Computer Sentiment
Mounting Tape

I like the way this turned out. I thought the off-center opening gives the card interest.

I am also submitting this to The Craft Spot for the Design Team Call. Wish me luck!

The weather here today is really nice. Warm, in fact. Indian summer. I should try to get outside and do some work around the house. I also have some sanding inside to do. We'll see what, if anything, gets done. lol

All you mothers, grandmothers and mothers-to be, if you get a chance to see a show called "Motherhood, The Musical", you should definitely go see it. I went last night with my best friend, Trish, and it was just SO GOOD. I laughed so hard I cried. Such an excellent show. We saw it at Society Hill Playhouse in Philadelphia.

Hope you all have a great day...enjoy
Leave a comment...I would love to hear from you.
imagine what you could do...

Sunday, October 2, 2011

The Paper Players Challenge..."Music"

Second post for today...

"Music" was the name of the challenge at The Paper Players. (Add music to your project or create a project inspired by your favorite song). I thought that this would be a good chance for me to use the music embossing folder (Allegro) with the Core'dinations Cardstock pad that I had just purchased.


Finished Card: 4 1/4" x 5 1/2"

Materials:
Cardstock: Gray, White, Yellow, Black and Black/Gray Core'dinations
Cricut Cartridge Create A Critter Bee, page 68 (Base, Layer 1 Base)
Cuttlebug Embossing Folder Allegro
Queen and Co Pearls Nightfall, 2 Large
Computer Sentiment
Bee Sticker

The sentiment is actually the title of a Bee Gees song (You Should Be Dancin')...I took a little artistic license with this...lol. I have never used the Cord'dinations paper before and I thought it worked well. I usually am a very straight-cut kind-of a designer, but because of the gray "core", I wanted it to show, so that's why I ripped the edges. I continued that thought with the sentiment also.

Hope you like this project...let me know and leave a comment. Thanks for stopping by.

imagine what you could do...

Sunday, April 3, 2011

Cricut Cardz Challenge...

I was thinking a little outside of the box on this one (I think anyway). The challenge at Cricut Cardz Challenge  was "to see a house image from any cartridge, a touch of lace and a flourish. You can make your cards using any colors you'd like". 

This is what I came up with:


My house is the beehive, the lace is behind the "honeycomb lace" and the flourish is the bee flying line. 

Finished Card: 4 1/4" x 5 1/2"

Materials:
Cardstock: White, Yellow, Black, Patterned Paper and Clear Craft Plastic ( for the Bee's Wings)
Cricut Cartridge Create-A-Critter Bee page 68, (Base, Layer 1 Base, Accessory Base and  Accessory Shift)
Cricut Cartridge George and Basic Shapes Octagon page 107 (Silhouette Shift)
Cricut Cartridge Wall Decor and More Clock (Flourish) page 67 (Font Base)
Cricut Design Studio
Cuttlebug Embossing Folder Tiny Mosaic
Lace
Brown Chalk
Mounting Tape

Hope you like my interpretation of a house. It's a fun card for a fun challenge.  

Would love to hear your comments. Thanks.

imagine what you could do.......


Thursday, February 24, 2011

Make A Splash

I had another one of those weeks where life gets in the way of crafting.
I made this card for Fantabulous Cricut (Use embossing) and Scrappy Moms Stamps (Use Create A Critter Cartridge) Challenges.

Finished Card: 4 1/4" x 5 1/2"

Materials:
Cardstock: White, 3 Shades of Orange, Green, Tan, Clear Vellum, Clear Craft Plastic and Patterned Paper.
Cricut Cartridge Create A Critter Fish and Fishbowl page 43 (Base, Shift Base, Shift Layer 1, Base Layer 2, Shift Layer 2, Base Layer 3, Shift Layer 3); Gator/Splash drop (bird's wing) page 45 (Shift Layer 2).
Cricut Design Studio (paper placement and to stretch bird's wing to make it look like a splash drop)
Cuttlebug Embossing Folder Tiny Mosaic
Cuttlebug Embossing Folder Herringbone
Pigment Ink: White (for stones on bottom of fishbowl), 2 Shades of Blue (rubbed over the clear vellum for water and splash)
Computer Sentiment

This is how I layered the fishbowl: Clear Vellum Fishbowl, Tan Stones, Green Plants, Fish, Clear Vellum Splash, Clear Vellum Water and Clear Craft Plastic Fishbowl. (Not sure is you can see the top clear layer...looks really cool in person).

Well, the new Expression is working very well...in fact, I only had to cut the cardstock once (instead of twice) and the clear craft plastic cut with only two cuts. The last time I tried to cut the plastic with the old machine, it never cut all the way through, even after 4 cuts. So, this was pretty exciting...lol. (It's the little things..you know!)
 
Hope you like the card. Leave a comment/become a follower...only 14 to go for 50 followers...Would love to hear from you. Thanks....imagine what you could do....

Monday, January 24, 2011

Two Different Challenges...One Basic Card...Two Different Looks

The first challenge is Fantabulous Cricut Challenge #44 Neglected Cartridges (click here) ...Make a project using a cartridge that you haven't used in 6 months. The other challenge is for Robyn at The Pink Stamper. Today is her birthday, (Happy Birthday Robyn), and she challenged everyone to make a birthday project. (Click here). Here is my card:


I also made the same basic card, just changed the paper a little bit.


I like both of them. What do you think?

Finished Card: 4 1/4" x 5 1/2"

Materials: (first card)
Cardstock: White, Red, Yellow, Brown, Black, Green and Patterned Paper
Cricut Cartridge 50 States Oklahoma State Bird page 48 (Base Bird and Shift Bird)
Cricut Cartridge Create-A-Critter Owl (Branch) page 25 (Base Accessory and Shift Accessory)
Cricut Cartridge George and Basic Shapes Square1 page 109 (Shift Silhouette)
Cricut Design Studio
Inkadinkado Happy Everything Stamps "Happy Birthday"
Black Pigment Ink
Mounting Tape
Chalk (to show the lines on the bird)

Materials: (second card)
Cardstock: White, Blue, Yellow, Brown, Green and Black
Cricut Cartridge 50 States Oklahoma State Bird page 48 (Base Bird and Shift Bird)
Cricut Cartridge Create-A-Critter Owl (Branch) page 25 (Base Accessory and Shift Accessory)
Cricut Design Studio
Cuttlebug Embossing Folder Happy Birthday
Inkadinkado Happy Everything Stamps "Happy Birthday"
Black Pigment Ink
Mounting Tape
Chalk

My neglected cartridge is 50 States. I used it probably a year ago, or more, when I was making a scrapbook for my son, but haven't touched it since. It really has some beautiful images of different birds, as well as different flowers. If you have this cartridge, I would take another look at it.

The bird image is a little more realistic rather than a "cutesy" one, and works well for an adult's birthday card. I like both styles...just depends on what your needs are at the time.

Thanks for taking the time to look...I appreciate it...If you are not a follower yet, please think about becoming one...I'd like to have a give-away once I reach 50 followers. If you are one already, thanks! Leave a comment and let me know what you think.....imagine what you could do

Tuesday, January 11, 2011

Fantabulous Cricut Challenge #42 Winter Warmies

This is my card for Fantabulous Cricut Challenge this week. These are the instructions:


Challenge #42 Winter Warmies
Create using some type of winter clothing/accessory on your project (i.e.: mitten, sweater, hat etc.)


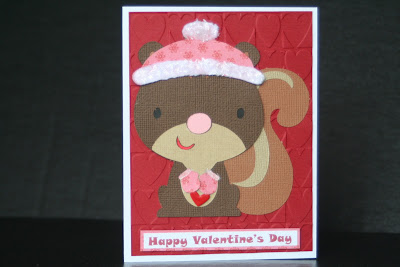
Well, as you can see, I have Valentine's Day on the brain. (Thought it came out cute).

Finished Card: 4 1/4" x 5 1/2"

Materials:
Cardstock: White, Black, Pink, Dark Red, Dark Brown, Medium Brown, Tan and Patterned Paper
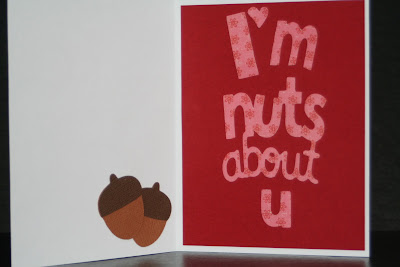
Cricut Cartridge Create A Critter Squirrel page 32 (Base, Layer 1, Layer 2, Layer 3), Nuts (Accessory and Shift Accessory), "nuts about u" (Phrase)
Cricut Cartridge Mickey Font "I" and "m"
Cricut Cartridge Everyday Paper Dolls Winter B (Hat and Gloves) page 36 (Shift Headwear, Shift Accessories 1)
Cricut Design Studio
Cuttlebug Embossing Folder Heart Blocks
Doodlebug Design Crushed Velvet Flock White
Martha Stewart Tinsel Glitter Crystal
Colorbok Metal Accents Hearts
Computer Printed Sentiment "Happy Valentine's Day"

Hope you like the card. Would love to hear from you...leave a comment. Thanks.
Get inspired...try a challenge, imagine what you could do (you might me surprised!)

Friday, November 19, 2010

Nuts About You

Just a fun card...

and the inside...


I'm sending this to my son who is away at college. He loves that I makes cards and has been wondering how come he hasn't received any since he has been away. I just hope he gets it before he sees this post...we'll see. (lol)

Finished card: 4 1/4" x 5 1/2"

Materials"
Cardstock: White, Three Shades of Brown and Patterned Paper
Cricut Cartridge Create a Critter, Squirrel, page 32 (Base, Layer 1, Layer 2, Layer 3, Accessory, Accessory Shift, Phrase and Phrase Shift)
Sizzix Embossing Folder, Plaid
Ribbon
3D-Dots

Pretty quick and simple once everything is cut. Sometimes simplicity says it all...don't you agree?
See you soon...imagine what you could do

Saturday, November 13, 2010

"Family" Autumn Banner

I had seen a few banner blog hops recently and I was inspired to make one myself. Since I am having Thanksgiving dinner this year, I thought this would be appropriate to have hanging up.

Here are some close-ups of the leaves...
Wow..I just noticed in my photos that my walls look gray; in reality, they are peach...weird. Well anyway, I thought it turned out really nice and now I am so inspired that I will be making one for Christmas.
 
Finished banner: approximately 3 feet (from end of leaves; with the ribbon on each end, add about another 8" on each side)
Leaves are cut at 6"
Acorns are cut at 1 1/2" for the ones on the ends, and 1" for the ones in the middle

Materials:
Cardstock: Brown (2 shades), Gold, Orange, Mustard, Rust, Red Orange and Yellow Orange (each leaf in "Family" is a different color. The leaves on the ends are the same as the "M" and "A", respectively.
Cricut Cartridge Cupcake Wrappers, Leaf (Layer Toppers, 7th button)
Cricut Cartridge Create A Critter, Acorn page 32 (Accessory Base and Shift)
Cricut Cartridge George and Basic Shapes, "Give" "Thanks"
Cricut Design Studio
Cuttlebug Embossing Folder D'Vine Swirls
Cuttlebug Embossing Folder Swiss Dots
Sizzix Embossing Folder Plaid (Acorn Tops)
Thin Green Ribbon
3D-Dots

Another thing I noticed AFTER I finished this banner was that I had just bought a tablecloth that had leaves and acorns on it also. Strange how it worked out...lol. I am having 10 people over which should be nice...not too many but not too little. Unfortunately, my husband has to work, so I guess my boys had better help me out. Basically, I am going to try to get as much done beforehand. Going to try NOT to stress. Hahahahahahahaha...well, I'm trying to think that I won't. How about you? When you are entertaining, do you stress out or are you one of the lucky ones that just can relax and have fun. (Boy I envy that). I am better once everything is in place.

More than likely, I am finished with making any fall/Thanksgiving projects. Christmas is on the brain. See you soon. I would love for you to leave a comment. Thanks...and imagine what you could do...

Wednesday, August 18, 2010

It's a Boy


As you can see, I didn't get this posted last night or before work this morning. I tried, but it just wasn't happening...

My neighbor's daughter had a baby recently and I thought I would make a card to celebrate the blessed event.

My base card is half of a 8 1/2" x 11" sheet of white cardstock. The animal patterned background cardstock is cut at 4" x 5 1/4". I then rounded the corners with  my EK Success Paper Shapers Corner Adorner  Rounder Punch - Large (now that was a mouthful!) I cut the blue cardstock at 2" x 3 3/4" and the orange gold cardstock at 2 1/2"  x 4". I also rounded the corners on these papers. I cut the giraffe at 3 3/4" from Cricut Cartridge Create A Critter. The base cut is in turquoise, layer 1 is in light blue and layer 2 is in the orange gold cardstock. I embossed the orange gold layer with Cuttlebug Tiny Mosaic Embossing  folder. After assembling the layers together, I used Crayola Glitter Glue - clear to fill in the dots on the giraffe. Let dry thoroughly. I dotted the eyes with a black marker. "It's a Boy" is cut at 1" from Cricut Cartridge New Arrival in the same turquoise cardstock used for the base of the giraffe.

I glued the patterned paper down first. Next I tied a light blue ribbon in a knot around the orange gold cardstock and cut the ends on a angle. I then glued "It's a Boy" on the cardstock and adhered that to the patterned paper. Glue the giraffe on the blue cardstock. Overlapping the orange gold cardstock, glue the blue cardstock down. Finally, I doodled a line and dots on two edges of the blue cardstock and one bottom edge of the orange gold cardstock with a Gelly Roll white pen.


Here is the finished card again. Inside, I stamped "Congratulations" with Fiskars All Year Greetings clear stamps in Sky Blue ink.

Hopefully I will get some sleep tonight. Niki, the new puppy, didn't want to sleep last night...she discovered the rabbits under the shed yesterday and all she wants to do is go outside. I'm not sure how I will be discouraging this behavior.

Hope you are inspired to do some crafting and as always...imagine what you would do.................
Related Posts with Thumbnails