Showing posts with label Cricut Cartridge George and Basic Shapes. Show all posts

Sunday, June 9, 2013

Angry Birds Birthday Gift Bag and Card

My granddaughter, Gianna, was invited to a birthday party and the theme was Angry Birds. I thought I would make up a gift bag and card to go along with the theme.


What do you think?

Finished Bag: 8" x 10" x 4 3/4"
Finished Card: 4 1/4" x 5 1/2"

Materials:
White Gift Bag
Cardstock: White, Brown, Black and Red
Cricut Cartridge George and Basic Shapes, Various Base Letters
Angry Bird Images from Computer
Inkadinkado Thinking of You All Occasions, "Happy Birthday to a Special Person"
Black Ribbon

 The slingshot is hand cut. The bird on the bag is fussy cut. The inside of the card says "Happy birthday to a Special Person".  It was actually very easy to make. I think it turned out cute. 

thanks for dropping by. Please leave a comment. 

imagine what you could do...

Thursday, March 15, 2012

"Hoppy Easter"

Pin It


I just ran across a new challenge blog (at least for me)...it's called Go Fish The Challenge Blog. (Create an Easter project).

This is what I came up with:


Finished Card: 4 1/4" x 5 1/2"

Materials:
Cardstock: White, Pink, Black and Patterned Paper
Cricut Cartridge George and Basic Shapes 2 circles,  2 fat ovals and 4 ovals
Cricut Cartridge Flower Shoppe Mum, Button 10
Cricut Design Studio
Computer Sentiment In Pink Pigment Ink
Black Sharpie Marker
Queen and Co Pearls, Pearl 3 Medium
Mounting Tape

I was inspired by a project I saw on Pinterest. I went through all my Cricut Cartridges but couldn't find any bunny/rabbit that worked. So, I went to my George Cartridge and Design Studio then designed the bunny that I wanted. I think he turned out just right! I used the Mum Flower from Flower Shoppe and the same paper as the background to make the tail.

Let me know what you think....

imagine what you could do.....

Saturday, February 11, 2012

CardzTV Stamps Design Team "I {Heart} U" Blog Hop (Feb 11th and 12th)

Pin It


I know it's a few days away yet, but Happy Valentine's Day!


However right now, it's Blog Hop time here with the CardzTV Stamps Design Team...woo hoo! It's called "I {Heart} U" (Make a Valentine's Day Project). You should have come from Little Scrap Pieces with Karen; if so, then you are in the right place. If you just happen to stop by, thank you, but you might want to start at the beginning of the hop so you don't miss any of the great projects (and maybe some blog candy) from the other designers.


Every year I give something to my family for Valentine's Day. This year, I made a box to hold a Valentine's treat (M & M's) and a matching card. Well, actually I made 6 of them (lol). I do want to tell you first that I designed the box myself with Design Studio and George and Basic Shapes. I am so proud of that!


Here are all 6 of projects together:


In sets of 3:


A close-up of just one of them:


And with the card opened:


Finished Boxes: 2 1/4" x 2 1/4" x 4 1/2" (not including the tulle bow)


Materials:
Cardstock: Pink (for the one box) and 5 Different Double-sided Patterned Cardstock (for the other 5 boxes)
Cricut Cartridge George and Basic Shapes
Cricut Cartridge Tags, Bags, Boxes and More Heart, page 108 (Blackout)
Cricut Design Studio
CardzTV with Mary Clear Stamps Be My Valentine, (Heart) and "Be My Valentine"
Marking Memories Scrapbook Embellishment Storage Jars
Martha Stewart Edger Doily Lace Punch
Clear Plastic (for window in box)
Mounting Tape
Red Tulle
Red, Pink and White Curling Ribbon
White Elastic (to tie the card onto the box)
Red and Black Pigment Ink
M & M's


First, I put the candy in the jars:


Then I designed a box on Design Studio so that the jars would fit just right:


After scoring and folding, I cut a piece of clear plastic to fit over the window and glued it in place. I glued the box together, only gluing the long side (the top and bottom are not glued):


Next, I put the jar in the box. This is the pink box that I stamped with CardzTV heart stamp:


I made a card for each box using matching paper. The cards are cut 2 1/4" x 4". Fold in half, then punch the one side with the doily lace edger punch. The hearts are from TBBM and cut at 1 1/2" and 1 3/4" (I think. It could be 1 1/4" and 1 1/2" I don't remember the exact measurements for them...sorry). There is no shadow feature, so that's why I cut the white hearts 1/4" bigger. Glue the hearts together, then I used mounting tape to adhere them to the front of the card. This way they pop up a little and give some dimension. (it may be hard to see that in the photos). I then stamped "Be My Valentine" on the inside of the cards.


Finally, I wrapped red tulle around the box and tied a bow. I cut 3 pieces of curling ribbon (one each color) and tied that around the tulle bow and curled. I tied a loop of elastic on the card and then looped it around the tulle bow also:


Ok so now it's time for the Blog Candy (Yippeee!)


This is what I am giving away: A Clear Stamping Block, Four Sets of Clear Stamps (Valentine's Day, St Patty's Day, Easter and Spring), A Pack of Rhinestones, A Pack of Pearls and A Couple of Pages of Stickers (Valentine's and St Patty's).

In order to win my blog candy, you need to 1. Be a follower, 2. Leave a comment on THIS post and 3. Leave me a way to contact you (just in case you win)...I will pick a winner on Monday, Feb 13th...Good Luck.

Don't forget, Mary at CardzTV is giving away 2 sets of Stamps, so make sure you stop there (first stop on the hop) and leave a comment on THAT blog. 

The next stop is Stampin Pearls with Candace. Enjoy the rest of the hop...

In case you have gotten lost, here is the entire list of designers:
Dana - http://www.iwycd.blogspot.com/ (YOU ARE HERE)

I will be entering this project into the following challenges: Fantabulous Cricut (Love is in the Air (Include a heart), The Cuttlebug Spot (Create something with hearts and a stamp), Scrappy Moms Stamps Hearts Galore (Hearts as the main element) and My Craft Spot Valentines! (Valentine Card or Treat Packaging).
Thanks for dropping by....I hope you like my project.

imagine what you could do...

Wednesday, January 18, 2012

Nuts 4 U

Quick post tonight...

I made this card for three challenges: Bitten By The Bug 2 Number Challenge, Celebrate the Occasion "Any Occasion (must use Polka Dots)"!!! and Die Cuttin' Diva's Squirrels. I like the way this turned out...I hope you do too.


Finished Card: 4 1/4" x 5 1/2"

Materials:
Cardstock: White, Red, Black, Two Shades Brown, Gray and Patterned Paper
Cricut Cartridge Stretch Your Imagination Squirrel, page 46 (Base Shift, Layers Shift and Shadow Shift)
Cricut Cartridge George and Basic Shapes "4", page 85 (Shadow Base)
Cricut Cartridge Old West "N", "U", "T" and "S", various pages
Cricut Design Studio
Black Chalk
Small Heart Punch
Mounting Tape

I mounted the Squirrel and Nuts and the "4". "Nuts" was welded together in Design Studio. I chalked the Squirrel, the acorn caps and the "4" for a little more dimension.

Thanks for stopping by. Leave me a comment....

imagine what you could do...

Sunday, January 1, 2012

Happy New Year 2012

2nd Post
I was inspired by Times Square last night, so I made this card.


Finished Card: 4 1/4" x 5 1/2"

Materials:
Cardstock: White, Black, Green, Dark Red and  Patterned Paper
Circuit Cartridge George and Basic Shapes Numbers "0", "1" and "2"
Sizzix Embossing Folder Plaid
CardzTV with Mary Clear Stamps Ticket Talk, "Happy New Year!"
McGill Super Giant Punch Circle
Paper Shapers 1 3/8" Circle Punch

Have a great day...

imagine what you could do...

Monday, September 5, 2011

Cricut 360 Challenge # 10 Grandparents Day

Grandparents Day is on Sunday. Hooray for Grandparents! I know how much mine meant to me. (I hope that my Granddaughter, Gianna, will feel the same about my husband and myself). Anyway, that is the challenge this week at Cricut 360.

I made a card for Gianna to give to her Pop Pop (my husband). I hope he likes it...


Finished Card: 4 1/4" x 5 1/2"

Materials:
Cardstock: White, Black, Red, Patterned Paper and Clear Craft Plastic (for the bottles)
Cricut Lite Cartridge Block Party Soda 1, Button 27 (Base, Shift and Layer)
Cricut Cartridge George and Basic Shapes "I" "M" "Y" "P" "O" and a Heart, various pages.
Cricuit Design Studio (to weld the "MY" and "POP")
Mounting Tape

To all the grandparents out there...Have a wonderful day!

imagine what you could do...


Fantabulous Cricut Challenge "Back To School"

It's back to school time! That's what Fantabulous Cricut has for a challenge this week. (Use your ABC's and 123's on your project). I had a really hard time with this one...and I'm not sure why. I then thought about my granddaughter, Gianna, and that in a few years she will be starting school. So, I thought I would make a layout for her first day of Kindergarten. Here it is:


I thought this would look alittle more "girly" instead of using the usual primary colors.

Finished Layout: 12" x 12"

Materials:
Cardstock: Two Shades of Pink, Four Shades of Purple, Silver and Patterned Paper
Cricut Cartridge Locker Talk Scissors, page 35 (Base and Layers Base), Crayon 1, page 36 (Base and Layers Base), Kindergarten, page 72 (Shift Base and Layers Shift)
Cricut Cartridge George and Basic Shapes "1" "2" "3" "4" "5" Various Pages
Cricut Design Studio
Queen and Co Pearls, Silver

Can't believe it's Labor Day. Where did the summer go? I don't feel like I even had a summer because of work. I got down to the shore only a couple times this year. I love sitting on the beach and watching the waves. Maybe next summer will be better...

Have a great Labor Day...

imagine what you could do....

Monday, August 8, 2011

Let's Get Buggy!

At Fantabulous Cricut this week, the challenge was "Let's Get Buggy!" (Use a bug on your project). I decided to make a Get Well Card. Here it is:


and the inside:


Finished Card: 4 1/4" x 5 1/2"

Materials:
Cardstock: White, Dark Blue, Black, Green Patterned Paper and Blue Striped Patterned Paper.
Cricut Cartridge Cricut Everyday Cricut page 22, (Phrase Base and Shift) and page 23, (Base Shift and Layer 1 Base)
Cricut Cartridge George and Basic Shapes "?" page 89, (Base Shift and Shadow Shift
Cricut Design Studio
Cuttlebug Embossing Folder Swiss Dots
Queen and Co Pearls, 2 Small Nightfall and 1 Small and 2 Medium Grass Green
Inkadinkado Happy Everything Stamp Set (feel better soon)
Black Pigment Ink
Mounting Tape

A few months ago, I won a 3 month membership to the Cricut Circle and as one of the perks, I received the Cricut Cartridge Cricut Everyday. (I'll be honest, I am completely lost how to use Cricut Circle. My membership is almost up, but if anyone could give me a hint, I would appreciate it...I feel so stupid!) Anyway, all of the cuts on the cartridge are somehow related to crafting. I wasn't sure how I was going to use this cartridge when I received it; however, when this challenge came about, I thought of the Cricuit "Bug" and a play on words. (I thought it was cute/funny anyway...lol).


Wanted to share this picture of my son and my granddaughter (his daughter) in the pool this past week. She is such a ray of sunshine in our lives.

Hope that you have a wonderful week.

imagine what you could do...

P.S. This month is a year since I started my blog. I can't believe it's been that long already! Also my birthday is coming up at the end of the month, so keep checking back as I am planning on a give-away.
And as always, leave me a comment, I love hearing from you! Thanks!!


Tuesday, May 24, 2011

You LIght Up

It feels like it's been forever since I have made anything. Between working on the projects around the house and my new work schedule (which is temporary), my craft area has been very quiet. I was planning this masculine card for two challenges but I didn't get it finished in time. So I'll just be posting it and hope that you like it. I was inspired by Mary at Cardz TV. She has a video on how to make a Twisted Easel Card. I thought I would give it a try. (Thanks Mary).


 I really like the way it turned out (simple but to the point). The white strip is for any personal message.

Finished Card: 4 1/4" x 5 1/2"

Marterials:
Cardstock: Black, Gray, Silver, Yellow and White
Cricut Lite Cartridge Handy Man Flashlight, (Base, Shift, Layer and Shift Layer)
Cricut Cartridge George and Basic Shapes Oval 1, page 114 (Shift Base)
Cricut Design Studio
Center Point on Cricut Expression (with the oval)
Cuttlebug Embossing Folder Diamond Plate
Inkssentials Glossy Accents
Charcoal Chalk
Computer Sentiment

Hopefully, I'll be able to make some other projects this week...wish me luck...Until then, have fun creating, cause imagine what you could do.....

Sunday, April 3, 2011

Cricut Cardz Challenge...

I was thinking a little outside of the box on this one (I think anyway). The challenge at Cricut Cardz Challenge  was "to see a house image from any cartridge, a touch of lace and a flourish. You can make your cards using any colors you'd like". 

This is what I came up with:


My house is the beehive, the lace is behind the "honeycomb lace" and the flourish is the bee flying line. 

Finished Card: 4 1/4" x 5 1/2"

Materials:
Cardstock: White, Yellow, Black, Patterned Paper and Clear Craft Plastic ( for the Bee's Wings)
Cricut Cartridge Create-A-Critter Bee page 68, (Base, Layer 1 Base, Accessory Base and  Accessory Shift)
Cricut Cartridge George and Basic Shapes Octagon page 107 (Silhouette Shift)
Cricut Cartridge Wall Decor and More Clock (Flourish) page 67 (Font Base)
Cricut Design Studio
Cuttlebug Embossing Folder Tiny Mosaic
Lace
Brown Chalk
Mounting Tape

Hope you like my interpretation of a house. It's a fun card for a fun challenge.  

Would love to hear your comments. Thanks.

imagine what you could do.......


Yum...Challenge at The Paper Variety

Thought this was a fun challenge at The Paper Variety. Recipe Challenge 1-2-3. You choose.

Here is my card:


My recipe is: 1-Word, 2-Scoops of Ice Cream and 3-Pink Pearls.

Finished Card: 4 1/4" x 5 1/2"

Materials:
Cardstock: White, Pink, Cream, Brown, Yellow/Orange and Patterned Paper
Cricut Cartridge Sweet Treats Ice Cream 6 page 35, (Base, Base Shift, Layers and Layers Shift)
Cricut Cartridge George and Basic Shapes "Y""U""M" various pages, (Base)
Sizzix Embossing Folder Plaid
Cuttlebug Embossing Folder D'Vine Swirls
Queen and Co Pearls Orchid (3)
Inkssentials Glossy Accents
Mounting Tape

I just thought this looked so yummy. Hope you do too.

Leave a comment...I always love to hear from you. Thanks.

imagine what you could do......

Sunday, February 13, 2011

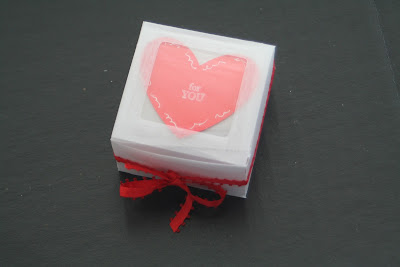
Valentine's Box

It's been a week since I was able to make anything. So, what have I been doing? Well, actually I have been going crazy trying to find kitchen appliances...what an stressful experience. Then I was a "Creative Consultant" designing a menu and business card for a friend.


Anyway, to my project. I am going to submit this to Die Cuttin' Diva's Challenge #2 Love is in the Air.


 Finished Project: 2 1/2" x 2 1/2" x 1 1/2"

Materials:
Red Cardstock, Clear Vellum and Clear Plastic
Cricut Cartridge Life's A Party Window Box page 66 (Base)
Cricut Cartridge George and Basic Shapes Heart 1 page 119 (Base)
Inkadinkado Happy Everything Stamp Set "For You"
White Pigment Ink
White Pen
Red Ribbon

I cut the box from a piece of 8 1/2" x 11" sheet of vellum...fit to page. On the bottom of the box, I placed a small piece of clear plastic. I thought this would make the box sturdier. I also glued a piece of clear plastic in the window section of the box. I stamped the heart, made some swirl marks and glued it to the one flap of the box, so it would show through the window when closed. I added a bow and put in some Hershey Kisses.

This was a fairly quick project. I hope you enjoy it...imagine what you could do.....

Monday, January 24, 2011

Two Different Challenges...One Basic Card...Two Different Looks

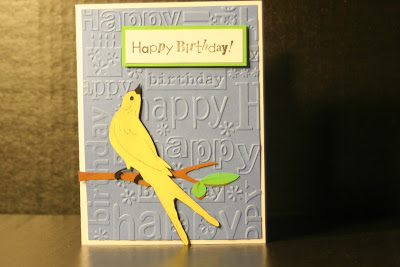
The first challenge is Fantabulous Cricut Challenge #44 Neglected Cartridges (click here) ...Make a project using a cartridge that you haven't used in 6 months. The other challenge is for Robyn at The Pink Stamper. Today is her birthday, (Happy Birthday Robyn), and she challenged everyone to make a birthday project. (Click here). Here is my card:


I also made the same basic card, just changed the paper a little bit.


I like both of them. What do you think?

Finished Card: 4 1/4" x 5 1/2"

Materials: (first card)
Cardstock: White, Red, Yellow, Brown, Black, Green and Patterned Paper
Cricut Cartridge 50 States Oklahoma State Bird page 48 (Base Bird and Shift Bird)
Cricut Cartridge Create-A-Critter Owl (Branch) page 25 (Base Accessory and Shift Accessory)
Cricut Cartridge George and Basic Shapes Square1 page 109 (Shift Silhouette)
Cricut Design Studio
Inkadinkado Happy Everything Stamps "Happy Birthday"
Black Pigment Ink
Mounting Tape
Chalk (to show the lines on the bird)

Materials: (second card)
Cardstock: White, Blue, Yellow, Brown, Green and Black
Cricut Cartridge 50 States Oklahoma State Bird page 48 (Base Bird and Shift Bird)
Cricut Cartridge Create-A-Critter Owl (Branch) page 25 (Base Accessory and Shift Accessory)
Cricut Design Studio
Cuttlebug Embossing Folder Happy Birthday
Inkadinkado Happy Everything Stamps "Happy Birthday"
Black Pigment Ink
Mounting Tape
Chalk

My neglected cartridge is 50 States. I used it probably a year ago, or more, when I was making a scrapbook for my son, but haven't touched it since. It really has some beautiful images of different birds, as well as different flowers. If you have this cartridge, I would take another look at it.

The bird image is a little more realistic rather than a "cutesy" one, and works well for an adult's birthday card. I like both styles...just depends on what your needs are at the time.

Thanks for taking the time to look...I appreciate it...If you are not a follower yet, please think about becoming one...I'd like to have a give-away once I reach 50 followers. If you are one already, thanks! Leave a comment and let me know what you think.....imagine what you could do

Friday, January 7, 2011

Glitter and Packing Tape Card #2

Yesterday I posted two (2) cards and had said that I was going to play around to see if I could find any other images that would work with the packing tape and glitter technique. Well, I did. I found one on Cricut Cartridge Paper Lace that I thought would work. I used Cricut Design Studio in order to make it into a card. Here it is:


and the inside:


Finished Card: 4 1/2" x 5 "

Materials:
Cardstock: Blue and Light Teal
Cricut Cartridge Paper Lace Blossom 2 page 32 (Base)
Cricut Cartridge George and Basic Shapes
Cricut Design Studio
Martha Stewart Glitter Turquoise
Sizzix Embossing Folder Plaid
Cuttlebug Embossing Folder D'Vine Swirls
Packing Tape
Button

I like the effect of the two different embossing folders. Since I didn't add a sentiment on the front, I figured that I could add one to the inside (depending on what occasion I wanted to use it for).

These are really fun to make. I'm going to play around some more and see what other images that will work. Thanks for stopping by and let me know what you think. It's amazing what you can find on your cartridges that you didn't even know was there...I did, now imagine what you could do.....

Thursday, January 6, 2011

Glitter and Snowflakes

In November 2009, Joy from Everyday Cricut (formally Christmas with the Cricut) posted a card that I always liked. (Click here to see it). I finally took some time and made a version of it


and


and the inside (hopefully you can see the embossing cause I think it adds a little something to the card).

(The pictures don't really show the transparency of the design, which is so pretty). I intentionally left the inside blank so I could write a note.

Finished card: 4 1/2" x 5 "

Materials:
Cardstock: White and Purple
Cricut Cartridge Winter Woodland Snowflake 4 page 35 (Card), "Peace" page 75 (Card), "Snowy" page 79 (Card) and "Wishes" page 80 (Card)
Cricut Cartridge George and Basic Shapes (Circle welded inside of a Square)
Cricut Design Studio
Sizzix Embossing Folder Snowflakes
Clear Packing Tape
Martha Stewart Glitter Charoite and Kunzite
Rhinestones

I cut the card and words on Design Studio. Next, I put the packing tape on the back of the snowflake design then sprinkled glitter over the front where it is sticky. (Work on a craft mat when placing the packing tape on the back so it doesn't stick. Keep your fingers off the sticky part also or the glitter won't adhere). Glitter the words and glue to the front. Attach the Square with the circle cut out on the back of the snowflake design. Emboss card with the Sizzix Snowflake folder. Add Rhinestone.

I would like to make these with all the different colors from the Martha Stewart Glitter. I think they would be really pretty.

I also submitted this to The Paper Variety Challenge "Snowflakes" Click here.

I was playing around with different shapes but I can't seem to get it to work. I'll have to keep playing, I guess. Hope you like my version...would love to hear from you...leave a comment...just imagine what you could do.....

Monday, December 20, 2010

Two Mini-Albums

Hope everything is going well for everyone. Are you ready for Christmas yet? I'm getting there. Spent the last two days wrapping presents. I also made some chocolate covered pretzels yesterday. I make them every year but didn't think I was going to have time this year. I still have to get stocking stufffers...hopefully later today.

I haven't had much time for crafting, I hope that is not the case for all of you. I did want to share a couple mini-albums that I made a couple of weeks ago. I was inspired a while ago by an album that was on Cardz TV. Who knew what you could make with flattened toilet paper rolls, paper and ribbon.

This is the first one I made. It says "XMAS". The letters are cut from Cricut Cartridge George and Basic Shapes. The tags are from Cricut Cartridge Tags, Bags, Boxes and More in Cricut Design Studio.


The tags you pull out say "Wishing You a Very Merry Christmas!" and the last tag holds a gift card as their gift.

This is the second one I made.  It says "4 YOU". (It's hard to read in the picture).


The tags in this one say " A Gift For You. Merry Christmas". Again, the last tag holds the gift card.

I plan on making more of these. I think they would be great for birthdays. I'm always looking for different and creative ways to give gifts.

Until next time, keep crafting and get inspired cause imagine what you could do.......

Saturday, November 13, 2010

"Family" Autumn Banner

I had seen a few banner blog hops recently and I was inspired to make one myself. Since I am having Thanksgiving dinner this year, I thought this would be appropriate to have hanging up.

Here are some close-ups of the leaves...
Wow..I just noticed in my photos that my walls look gray; in reality, they are peach...weird. Well anyway, I thought it turned out really nice and now I am so inspired that I will be making one for Christmas.
 
Finished banner: approximately 3 feet (from end of leaves; with the ribbon on each end, add about another 8" on each side)
Leaves are cut at 6"
Acorns are cut at 1 1/2" for the ones on the ends, and 1" for the ones in the middle

Materials:
Cardstock: Brown (2 shades), Gold, Orange, Mustard, Rust, Red Orange and Yellow Orange (each leaf in "Family" is a different color. The leaves on the ends are the same as the "M" and "A", respectively.
Cricut Cartridge Cupcake Wrappers, Leaf (Layer Toppers, 7th button)
Cricut Cartridge Create A Critter, Acorn page 32 (Accessory Base and Shift)
Cricut Cartridge George and Basic Shapes, "Give" "Thanks"
Cricut Design Studio
Cuttlebug Embossing Folder D'Vine Swirls
Cuttlebug Embossing Folder Swiss Dots
Sizzix Embossing Folder Plaid (Acorn Tops)
Thin Green Ribbon
3D-Dots

Another thing I noticed AFTER I finished this banner was that I had just bought a tablecloth that had leaves and acorns on it also. Strange how it worked out...lol. I am having 10 people over which should be nice...not too many but not too little. Unfortunately, my husband has to work, so I guess my boys had better help me out. Basically, I am going to try to get as much done beforehand. Going to try NOT to stress. Hahahahahahahaha...well, I'm trying to think that I won't. How about you? When you are entertaining, do you stress out or are you one of the lucky ones that just can relax and have fun. (Boy I envy that). I am better once everything is in place.

More than likely, I am finished with making any fall/Thanksgiving projects. Christmas is on the brain. See you soon. I would love for you to leave a comment. Thanks...and imagine what you could do...
Related Posts with Thumbnails