Showing posts with label Cricut Design Studio. Show all posts

Sunday, April 28, 2013

CardzTV Blog Hop "You're the Man!" Day 2 (Sunday Team)

We're having a Blog Hop here at CardzTV. Welcome!!! This is Day 2 and this is the Sunday Team. Yesterday the Saturday Team showed off their wonderful projects.
Now if you have come from Barbara's blog, then you are in the right place. The hop is showing off one of Mary's newest stamp sets..."You're the Man!" This set has so many great and manly sentiments...and a couple mustaches! lol Check out all of Mary's stamp sets here

I made a card with an Action Wobble:


Finished Card: 4 1/4" x 5 1/2"

Materials:
Cardstock: White, Tan, Teal, Black and Two Different Patterned Papers
Cricut Cartridge Accent Essentials Accent 4, page 75 (Base)
Cricut Cartridge Everyday Paper Dolls Head, page 28 (Base Shift); Farmer (Hat), page 68 (Headwear Shift)
Cricut Design Studio
CardzTV with Mary Clear Stamps You're The Man!, "You're the MAN!"; Large Mustache
Cuttlebug Embossing Folder Diamond Plate
Two Wiggle Eyes
Black Pigment Ink
Action Wobble
Small Circle Punch
Mounting Tape

Unfortunately, my camera will not let me get a picture of the Action Wobble in action. The eyes wiggle when it shakes back and forth also. I single mounted the head, the mustache and the sentiment. Now with Father's Day just around the corner, this would make a great card or it could be used for a birthday. I thought it turned out cute. Hope you do also...

Now don't forget that Mary always has some Blog Candy...2 sets of stamps...just make sure you leave a comment over there at CardzTV. Winners will be announced on Monday.

I also have some blog candy...woo hoo! Don't you just love it?


I have a 6" x 6" Designer Paper Pad and a 3 piece set of Darice Embossing Borders.
Please leave a comment AND a way to contact you on THIS post by Monday, April 29th Midnight EST. I will announce the winner on Tuesday or Wednesday. I would also appreciate it if you would become a follower. 

 Your next and last stop on the hop is Melissa. However, if you want to start from the beginning for Day 2, here is the full line-up:

Thanks for stopping by. 

imagine what you could do...


Saturday, March 24, 2012

Happy Easter Flowers

***********
For the CardzTV Spring Blog Hop, (March 24th and 25th) please click here or scroll down.


************


I was inspired to make this project for two challenge blogs...Fantabulous Cricut and Cupcake Inspirations.

Here is the other side:


Approximate Finished Size: 4 1/2" x 6 " x 4 1/2"

Materials:
Cardstock: White, Pink. Green, Yellow/Gold and Patterned Paper
Desert Diva Digital Images "Happy Easter" (both)
Spectrum Noir Markers
Giant Circle Punch
Cricut Cartridge Flower Shoppe Daisy, page 18 (Daisy 1 and Daisy 4) and Daisy Leaf, page 22 (Daisy 5)
Cricut Cartridges Sweet Tooth Boxes Cone, page 15 (Cone Layer 1 and Cone Layer 3)
Cricut Design Studio
Pink, Yellow, Green  and Black Pigment Inks
Small Styrofoam Ball (Cut in Half)
Hot Glue Gun
Spanish Moss
Toothpicks
Wire

For each Daisy: (I made 6 of them...3 in Pink and 3 in White)
Cut "Daisy 1" (center) at 2" in Yellow/Gold (cut 6 times)
Cut "Daisy 4" (petals) at 1 1/2" and 2" in Pink and White (cut 3 of each size)
Cut "Daisy 4" (calyx) at 1" in Green (cut 6 times)
Cut "Daisy 5" (leaf) at 1 1/4" in Green (2 leaves for each Daisy for a total of 12)
Glue the individual components together ( I suggest using hot glue...I used my adhesive gun first, but it came apart)
Use pigment ink on the edges (Yellow on the White Flowers, Pink on the Pink Flowers and Green on the Leaves)
Stick a toothpick into the back of the Daisy Centers, then glue each layer (Center, 1 1/2" Flower, 2" Flower, 2 Leaves to the back side of the 2" Flower and then the 1" Calyx (I also colored the toothpicks green...just in case they could be seen)

For the Pot (Cone):
I cut it out twice...once in White and once in Patterned Paper (I think it was at 8").
I glued the two together (to make it stronger)
Assemble
Fold the inside layer (normally to hold a cupcake) and place inside
Glue the half Styrofoam ball to the bottom center
Add a little Spanish Moss

For the Happy Easter Sign:
Download and print images
Color
Cut out with Giant Circle Punch
Tape a wire (approximately 5") to the back of one of the images
Glue other image to the back of the first image

Assemble together by placing the Daisies and Sign into the Pot

I am really happy how it turned out. I must admit I was hesitate to try the flowers because I don't really think the directions are very clear. I'm a much more visual person. However, I did it! (I bet you can too!)

Have a great rest of the day. Thanks for stopping by.

imagine what you could do...

Thursday, March 15, 2012

"Hoppy Easter"

Pin It


I just ran across a new challenge blog (at least for me)...it's called Go Fish The Challenge Blog. (Create an Easter project).

This is what I came up with:


Finished Card: 4 1/4" x 5 1/2"

Materials:
Cardstock: White, Pink, Black and Patterned Paper
Cricut Cartridge George and Basic Shapes 2 circles,  2 fat ovals and 4 ovals
Cricut Cartridge Flower Shoppe Mum, Button 10
Cricut Design Studio
Computer Sentiment In Pink Pigment Ink
Black Sharpie Marker
Queen and Co Pearls, Pearl 3 Medium
Mounting Tape

I was inspired by a project I saw on Pinterest. I went through all my Cricut Cartridges but couldn't find any bunny/rabbit that worked. So, I went to my George Cartridge and Design Studio then designed the bunny that I wanted. I think he turned out just right! I used the Mum Flower from Flower Shoppe and the same paper as the background to make the tail.

Let me know what you think....

imagine what you could do.....

Saturday, February 11, 2012

CardzTV Stamps Design Team "I {Heart} U" Blog Hop (Feb 11th and 12th)

Pin It


I know it's a few days away yet, but Happy Valentine's Day!


However right now, it's Blog Hop time here with the CardzTV Stamps Design Team...woo hoo! It's called "I {Heart} U" (Make a Valentine's Day Project). You should have come from Little Scrap Pieces with Karen; if so, then you are in the right place. If you just happen to stop by, thank you, but you might want to start at the beginning of the hop so you don't miss any of the great projects (and maybe some blog candy) from the other designers.


Every year I give something to my family for Valentine's Day. This year, I made a box to hold a Valentine's treat (M & M's) and a matching card. Well, actually I made 6 of them (lol). I do want to tell you first that I designed the box myself with Design Studio and George and Basic Shapes. I am so proud of that!


Here are all 6 of projects together:


In sets of 3:


A close-up of just one of them:


And with the card opened:


Finished Boxes: 2 1/4" x 2 1/4" x 4 1/2" (not including the tulle bow)


Materials:
Cardstock: Pink (for the one box) and 5 Different Double-sided Patterned Cardstock (for the other 5 boxes)
Cricut Cartridge George and Basic Shapes
Cricut Cartridge Tags, Bags, Boxes and More Heart, page 108 (Blackout)
Cricut Design Studio
CardzTV with Mary Clear Stamps Be My Valentine, (Heart) and "Be My Valentine"
Marking Memories Scrapbook Embellishment Storage Jars
Martha Stewart Edger Doily Lace Punch
Clear Plastic (for window in box)
Mounting Tape
Red Tulle
Red, Pink and White Curling Ribbon
White Elastic (to tie the card onto the box)
Red and Black Pigment Ink
M & M's


First, I put the candy in the jars:


Then I designed a box on Design Studio so that the jars would fit just right:


After scoring and folding, I cut a piece of clear plastic to fit over the window and glued it in place. I glued the box together, only gluing the long side (the top and bottom are not glued):


Next, I put the jar in the box. This is the pink box that I stamped with CardzTV heart stamp:


I made a card for each box using matching paper. The cards are cut 2 1/4" x 4". Fold in half, then punch the one side with the doily lace edger punch. The hearts are from TBBM and cut at 1 1/2" and 1 3/4" (I think. It could be 1 1/4" and 1 1/2" I don't remember the exact measurements for them...sorry). There is no shadow feature, so that's why I cut the white hearts 1/4" bigger. Glue the hearts together, then I used mounting tape to adhere them to the front of the card. This way they pop up a little and give some dimension. (it may be hard to see that in the photos). I then stamped "Be My Valentine" on the inside of the cards.


Finally, I wrapped red tulle around the box and tied a bow. I cut 3 pieces of curling ribbon (one each color) and tied that around the tulle bow and curled. I tied a loop of elastic on the card and then looped it around the tulle bow also:


Ok so now it's time for the Blog Candy (Yippeee!)


This is what I am giving away: A Clear Stamping Block, Four Sets of Clear Stamps (Valentine's Day, St Patty's Day, Easter and Spring), A Pack of Rhinestones, A Pack of Pearls and A Couple of Pages of Stickers (Valentine's and St Patty's).

In order to win my blog candy, you need to 1. Be a follower, 2. Leave a comment on THIS post and 3. Leave me a way to contact you (just in case you win)...I will pick a winner on Monday, Feb 13th...Good Luck.

Don't forget, Mary at CardzTV is giving away 2 sets of Stamps, so make sure you stop there (first stop on the hop) and leave a comment on THAT blog. 

The next stop is Stampin Pearls with Candace. Enjoy the rest of the hop...

In case you have gotten lost, here is the entire list of designers:
Dana - http://www.iwycd.blogspot.com/ (YOU ARE HERE)

I will be entering this project into the following challenges: Fantabulous Cricut (Love is in the Air (Include a heart), The Cuttlebug Spot (Create something with hearts and a stamp), Scrappy Moms Stamps Hearts Galore (Hearts as the main element) and My Craft Spot Valentines! (Valentine Card or Treat Packaging).
Thanks for dropping by....I hope you like my project.

imagine what you could do...

Friday, February 10, 2012

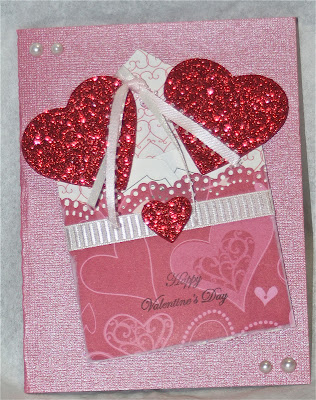
Valentine Card with Tag and A Little More...

Pin It


Bitten By The Bug 2 has a challenge to use any of the tags in the Sweetheart Cartridge. Well, I don't own that cartridge, so I found one on the Tags, Bags, Boxes and More Cartridge.

I made this card:


The tag has a pocket on it and inside holds a little extra...


Finished Card: 4 1/4" x 5 1/2"

Materials:
Cardstock: Shiny Pink, Red and Patterned Paper
Cricut Cartridge Tags, Bags, Boxes and More Tritop-h, page 87 (Shift) and Crctp2, page 95 (Blackout)
Cricut Design Studio
CardzTV with Mary clear Stamps Ticket Talk, "Ticket", "Happy Valentine's Day", "Good For One Kiss" and "Good For One Hug"
Martha Stewart Edger Doily Lace Punch
Nicole Glitter Foam Stickers Hearts, 2 Large and 1 Small
Queen and Co Pearls, Pearl 2 Large and 2 Medium
White Ribbon
Thin White Ribbon
Thin Pink Ribbon
Black Pigment Ink
White Pigment Ink
Red Pigment Ink
Mounting Tape

The tag is cut at 3" x 7 1/2", then scored at 3" and folded up. I punched the top edge, then glued the sides to make a pocket. I cut out two red hearts the same side as the large glitter hearts. I adhered the glitter hearts at the top of the "tickets" and the red hearts on the back.

Hope you like this project. Thanks for stopping by.

imagine what you could do...

Monday, January 30, 2012

Valentiny Cards

There is a challenge at Fantabulous Cricut called "Valentiny Cards" (make a 3 x 3 card for Valentine's Day). I made 3 cards.


Finished Card: 3" x 3"

Materials:
Cardstock: White, Dark Red, Pink and Three Different Patterned Papers
Cricut Cartridge Tie The Knot Thank You, page 59 (Base and Blackout/Shadow Shift)
Cricut Design Studio
CardzTV with Mary Clear Stamps "Ticket Talk", Three Different Size Hearts
Queen and Co Pearls, Orchid and Classy Red 2 Large, 2 Medium and 2 Small each
Queen and Co Rhinestones, Orchid 2 Large, 2 Medium and 2 Small
Red Pigment Ink
Mounting Tape

Fairly quick and easy project. I stamped the pink "Thank you" heart with the 3 hearts from CardzTV clear stamps with red pigment ink, glued it to the dark red heart and then used the mounting tape to adhere it to the background paper. I finished it with the pearls/rhinestones.

Leave a comment (always love reading what you think) and thanks for stopping by...

imagine what you could do

Saturday, January 21, 2012

"Let It Snow" Snowman

Pin It


At Fantabulous Cricut, the challenge is called "Snow Fun" (include a snowman or snowflake on your project).

I had fun making this card:


It may be hard to see in the photo, however, the silver area is see-though.

Finished Card: 3 1/4" x 5 3/4"

Materials:
Cardstock: Gray, White, Black, Light Blue and Dark Teal
Circuit Cartridge Winter Woodland Snowman, page 46 (Base, Shift, Layers Base, Layers Shift and Card Base)
Cricut Design Studio
CardzTV with Mary Clear Stamps Holly Jolly "Let It Snow!"
Doodlebug Design Inc Crushed Velvet Flock Black and Teal
ProArt Glitter White
Nicole Ultra Fine Premium Glitter Extra Fine Sterling
Queen and Co Pearls Nightfall 2 Small
Teal Pigment Ink
"Discarded" Snowflakes from Fiskars Border Punch Snowflake
Clear Tape
Mounting Tape

I very rarely use the "Card" layer on the cartridges, but I thought it would be fun to try it this time. First I cut out the card, the snowman and it's layers. Next I cut a second partial card image (the snowman side) and set it aside. I put clear tape on the back of the snowman card so the cutout areas had the sticky part of the tape facing up. The tape must be wide enough to cover the cutout areas so there are no creases or overlaps. I turned the card to the front and sprinkled the silver ultra fine glitter over it. It will only stick where the tape is. Flick off the excess. Now take the partial card and cut it down to just a little smaller to fit the back of the front of the card and adhere.


I hope you can see it. I glittered the snowman and flocked the hat, the bottom layer of the scarf and hatband. After the snowman and all the layers are glued together and the "eyes" are attached, I stamped the front of the card. Then, I used mounting tape to adhere the snowman to the front of the card. the last thing is to glue the snowflakes on.

I thought about placing white "Pearls" on the snowflakes, but decided it would be too much.

Hope you like my card.

Thanks for stopping by...I would love to hear what you think.

imagine what you could do...

Friday, January 20, 2012

Bubblegum Treat Box...My Version

I have been reading through other blogs and have noticed a bubblegum treat box that bloggers have been making. It's from My Creative Time. I think it's adorable.

Well, me, being me, decided to make my own version. I remember seeing a box that resembled half of the bubblegum treat box, but I couldn't remember which cartridge it was. After searching, I finally found it.

Here is my version:


Finished Box: 1 1/4" x 1 1/4" x 3"

Materials:
Cardstock: Patterned
Cricut Cartridge  Life's A Party Favor Box, page 69 (Base)
Cricut Design Studio

I placed the image on Design Studio twice. One of them as the regular image and the other as a flipped image.


I cut them out


and then cut the bottom of the boxes off. Folded and glued them


Then I placed one inside the other to form the bubblegum treat box.

Here is my version again:


I actually would like to decorate the box a little more...maybe some ribbon and a tag. I don't know, we'll see.

Hope you like my version of what I think is an adorable treat box. Thanks Creative Time for the inspiration.

imagine what you could do...

Wednesday, January 18, 2012

Nuts 4 U

Quick post tonight...

I made this card for three challenges: Bitten By The Bug 2 Number Challenge, Celebrate the Occasion "Any Occasion (must use Polka Dots)"!!! and Die Cuttin' Diva's Squirrels. I like the way this turned out...I hope you do too.


Finished Card: 4 1/4" x 5 1/2"

Materials:
Cardstock: White, Red, Black, Two Shades Brown, Gray and Patterned Paper
Cricut Cartridge Stretch Your Imagination Squirrel, page 46 (Base Shift, Layers Shift and Shadow Shift)
Cricut Cartridge George and Basic Shapes "4", page 85 (Shadow Base)
Cricut Cartridge Old West "N", "U", "T" and "S", various pages
Cricut Design Studio
Black Chalk
Small Heart Punch
Mounting Tape

I mounted the Squirrel and Nuts and the "4". "Nuts" was welded together in Design Studio. I chalked the Squirrel, the acorn caps and the "4" for a little more dimension.

Thanks for stopping by. Leave me a comment....

imagine what you could do...

Thursday, January 12, 2012

Caterpillar and Quote

I made this Gate-fold card for two challenges: Bitten By The Bug 2 (Caterpillar from Walk In My Garden Cartridge) and CropStop (You Can "Quote Me On That"!).


and the inside:

Finished Card: 4 1/4" x 5 1/2"

Materials:
Cardstock: White, Black, Green and Three Different Patterned Papers
Cricut Cartridge Walk In My Garden Butterfly, page 115 (Base, Shift and Base Shadow) and Caterpillar, page 120 (Base and Shift)
Cricut Design Studio
Computer Sentiment (Quote)
Two Googly eyes
Queen and Co Pearls, Nightfall (2 Medium) and Grass Green (1 Large, 1 Medium and 1 Small)
Green Chalk
Mounting Tape

I hope you noticed that the background for the caterpillar is leaves and the background for the butterfly is flowers. (Caterpillars eat leaves and Butterflies fly around the flowers).

Hope you liked the card.

Thanks for stopping by....I would love to hear from you (leave a comment). See you soon.

imagine what you could do...

Tuesday, January 10, 2012

For The Birthday Boy

I did things a little different this time. If you have been following me the past few days, you know that I've been challenging myself by picking a number that coordinates with one of my Cricut cartridges to use in a challenge. Well this time, Random Generator picked a number for me (my son was not around today to ask him) for my cartridge. I used Random Generator again and had the number coordinate with a page number for that cartridge. THEN I looked at the challenges that I have been considering. This is what I came up with: Celebrate The Occasion "Child's Birthday"and Die Cuttin' Diva's Blue, Silver and White.

My card:


and the inside:


Finished Card: 4 1/4" x 5 1/2"

Materials:
Cardstock: White, Blue, Silver, White/Blue Core-dinations and Patterned Paper
Cricut Cartridge New Arrival Truck, page 119 (Blackout Base, Shift Base and Blackout Shift)
Cricut Design Studio
CardzTV with Mary Clear Stamps Make A Wish, "Birthday Boy"
Studio G Clear Stamp Happy Birthday
Queen and Co Pearls Brilliant Blue, 2 Large and 1 Small
Blue Ribbon
Sanding Paper (for Core-dinations Paper)
Mounting Tape

Hope you try to challenge yourself in a new way...it makes you really think! Happy crafting...

Thanks for stopping by.

imagine what you could do...

Friday, January 6, 2012

Trying To Get Back In The Swing Of Things...Two Challenges

Well, I am trying to get back to crafting after it feels like forever....I made a card for two different challenges. The first one is The Paper Variety (Create a project using Black and White with a Kiss of Color (any color)). The second challenge is Die Cuttin' Diva's (sketch).

Here is the card:


Finished Card: 4 1/4" x 5 1/2"

Materials:
Cardstock: White, Black, Red and Two Different Patterned Papers
Cricut Cartridge Simply Charmed Cupcake 2, page 77 (Shift Base, Shift Layer 1 Shift Layer 2 and Shift Layer 3)
Cricut Design Studio
CardzTV with Mary Clear Stamps, Make a Wish "Happy Birthday!"
Martha Stewart Edger Doily Lace
1 1/4" Circle Punch
Martha Stewart Tinsel Glitter Crystal
Inkssentials Glossy Accents
Mounting Tape

I really like the way this turned out. However, with that said, I decided to make another card using the same sketch, but with different papers. Here is that card:


(Instead of Martha Stewart Tinsel Glitter, I used regular clear glitter). Now I also like the way this one turned out. I always think it is so cool how basically the same idea can look so different. What do you think? Which one do you like?

Well, I really want to get back to making another card, while I have a chance (lol)...Thank you for stopping by...(Leave a comment)

imagine what you could do...

Saturday, December 17, 2011

CardzTV Christmas Blog Hop December 17th and 18th

Christmas is just a week away...oh my! Are you finished your shopping and wrapping yet? I'm getting there. (lol) So glad you could take some time and stop by the First Christmas Blog Hop With CardzTV. If you have come from Little Scrap Pieces with Karen, you are at the right spot. If you just happen to stop by here but would like to hop along from the beginning, please start with CardzTV with Mary.

We (the Design Team) were asked to make anything with a Christmas theme and use CardzTV stamps. I came up with five different tags and used five different CardzTV Stamps from the "Holly Jolly" Set.


Here they are a little closer...
"From Our House To Your House"

"Deck The Halls!"

"Rocking Around The Christmas Tree"

"NO Peeking!"

"Have A Holly Jolly Christmas!"

Finished Tags: 2 3/4" x 4" (not including the ribbon)

Materials: 
Cardstock: White, Red, Brown and Green Patterned Paper
Cricut Cartridge Gingerbread, Tall House, Holly, Snowman, Present and Tree
Cricut Design Studio
CardzTV Clear Stamps "Holly Jolly"Set
White And Green Pigment Ink
Clear Glitter
Mounting Tape

I thought the cutouts looked like Christmas Cookies with Sugar on top.

In case you get lost along the way, here is the order of the designers and their blogs:


Mary - http://www.cardztv.blogspot.com/
Kate - http://www.scrapperscreativecorner.blogspot.com/
Melissa - http://www.melissa-moecreations.blogspot.com/
Susan - http://www.itsmesusanp.blogspot.com/
Elaine - http://www.expressionsbyelaine.blogspot.com/
Theresa - http://www.thescrapbookingqueen.com/
Laura - http://www.queenscardcastle.blogspot.com/
Kristin - http://www.pinkldycrafter.blogspot.com/
Shawnee - http://www.quiverofangels.blogspot.com/
Gloria - http://www.girliascards.blogspot.com/
Julie - http://www.cricutchick.com/
Jeri - http://www.bugnme.blogspot.com/
Nicole - http://www.teachdanz.blogspot.com/
Lynn - http://www.bootsandblingtime.blogspot.com/
Amanda - http://www.craftsbyamanda.blogspot.com/
Sue - http://www.suescraftymess.blogspot.com
Karen - http://www.littlescrappieces.blogspot.com/
Dana - http://www.iwycd.blogspot.com/    
 THAT'S ME!!!
DeNetra - http://www.craftynanny3.blogspot.com/
Sharon - http://www.meemeescreations.blogspot.com/
Candice - http://www.stampinpearls.blogspot.com/
Janis - http://www.pausedreamenjoy.blogspot.com/

Now who wants to talk about CANDY...WOO HOO!!!! I'll be 

giving away a Tim Holtz Alterations Texture Fades 

Embossing Folder 2 Pack "Snow Flurries & Snowman Set"

 
In order to win, you need to be a follower and leave me a 

comment on this post (also leave me a way to
 
contact you, should you be the lucky winner) by Sunday 

December 18th at 11:59 PM EST. It's that easy. I will draw a 

winner on Monday, December 19th. 


AND talk about more Candy, Mary at CardzTV  is giving 

away both the Gingerbread Cricut Cartridge and The 

CardzTV Holly Jolly Stamp Set that I used in my project. How

 cool is that? 


AND  our generous sponsor, Lynn at Boots and Bling Time is 

giving away A North Pole Collection paper Kit from Crate 

Paper. 


Your next stop is DeNetra at Craft With DeNetra.  

Please check out all the wonderful and creative projects that the 

designers have made. You may even find more blog candy...


Thanks for stopping by...don't forget to leave a comment and 

become a follower to have a chance to win.


imagine what you could do...


Related Posts with Thumbnails