I haven't been able to make anything lately. Now it's due to my monitor. It died. About a month ago, I bought a new computer, a Mac. However, is not compatible with my Cricut Design Studio, so I was using my old computer just for DS. Now I'm lost without it. I used DS for everything. If you have read my last post, you know that computer technology and I are not on good terms at the moment. Hoping to get this rectified soon. 'Til then, I hope you will continue to create something for me...
imagine what you could do....
Thursday, April 28, 2011
Wednesday, April 27, 2011
Easter, A Rainbow and a New Garden
Been busy the last few days. No paper crafting... :(
However, hope that you had a wonderful Easter. We had family over. I wasn't sure if I was going to be able to have our Easter Egg hunt this year, as the weather kept calling for rain. I decided to take a chance and hid 76 eggs all around my yard. The weather turned out gorgeous. Just about everyone came out for the hunt. Here are two of the girls hunting for eggs...


However, hope that you had a wonderful Easter. We had family over. I wasn't sure if I was going to be able to have our Easter Egg hunt this year, as the weather kept calling for rain. I decided to take a chance and hid 76 eggs all around my yard. The weather turned out gorgeous. Just about everyone came out for the hunt. Here are two of the girls hunting for eggs...


Of course, my middle son, Jason, who really wanted to join in the hunt, had to work. (Maybe I should make a special hunt for him. What do you think?) I had told you a while ago that we usually end up not being able to find a few eggs and that I had started to make a map, just so we could then find them easier. Well, I did make the map, and true to form, we were missing one egg. Even with the map, we had some trouble. I finally found it. Kept everyone busy in the meantime...lol. The rain did come (a little) and with it brought a beautiful rainbow...


You could see it from end to end. So, so pretty!
The last two days, I have been busy with work and making a new garden. On Monday, Joe (my husband) and Jason built the structure (I designed it and mostly supervised on this one...my back was really hurting) and yesterday, Jason and I went and got the soil. I then planted some tomato plants. What do you think?


(Not sure if you can tell, but the front is actually two gates that open up)

I bought some other vegetables (peppers, eggplant, cucumbers, and sting beans) but haven't planted them in the other garden yet.
I'm hoping to clean up my craft area a little this morning, while waiting for the repairman for my brand new dishwasher to show up. (Not even two months old). Also have to continue to work on Jason's bedroom...we're planning to paint and get a new rug. It's just never ending.....lol. Maybe tonight I'll get the chance to actually make a card...we'll see. There's always tomorrow...hahaha.
Have a great day...
imagine what you could do...
Note: I'll be without a dishwasher for at least a week...needs a new control panel! Sometimes I hate computer technology!
Sunday, April 24, 2011
Wishing Everyone a Very Happy Easter

Just a quick post today to wish everyone a very happy and blessed Easter. I hope you are able to spend it with loved ones...whether it be family or friends.
Don't eat too much candy...and save a chocolate bunny for me!
imagine what you could do...... :)
Wednesday, April 20, 2011
Another Mother's Day Card
I made another Mother's Day Card for two different challenges...Cardz TV (Make a Mother's Day card using the colors white, blue, green and purple) and Die Cuttin' Diva's (use a tag cut). Here is my card:

Finished Card: 4 1/4" x 5 1/2"
Materials:
Cardstock: White, Blue, Green, Purple and Patterned Paper.
Cricut Cartridge Wrap It Up Flower1 page 25, (Tag and Tag Blackout)
Cricut Design Studio
Green Ribbon
Mounting Tape
Computer Sentiment
Fairly easy card to make. I cut the blackout tag in blue then cut to fit the sentiment and green leaves. I used mounting tape to adhere the tag onto the shadowed tag and again on the shadowed tag to the card. (I made the shadow by cutting the white blackout tag 1/4" larger than the blue one and used "Hide Selected Contour" for the hole in the tag). I tied the ribbon through the hole in the tag and then tied a bow. I thought the background paper fit the challenge so well.
Have to run now...leave a comment (become a follower)...thanks for stopping by....
imagine what you could do.....
Tuesday, April 19, 2011
Mother's Day Card and Give-Away Winner
Thought I would enter this card into the Cricut Cartridge Chaos Challenge at More Than Favors.


Finished Card: 4 1/4" x 5 1/2"
Materials:
Cardstock: White, Pink, Green, Black and Patterned Paper
Cricut Solutions Cartridge Indie Art Button 24, (Base, Shift and Shadow)
Ruby and Fresh Green Pigment Inks
Mounting Tape
Computer Sentiment
I showed this card to my three sons. My oldest son said, "I really like this!" My middle son said, "I'll buy it from you. Then I can give it to you for Mother's Day." (and then he laughed). My youngest said, "Mom, these (your cards) are so nice. I wish I could make them to give to you". I think that those are the nicest comments a mother could get.
I showed this card to my three sons. My oldest son said, "I really like this!" My middle son said, "I'll buy it from you. Then I can give it to you for Mother's Day." (and then he laughed). My youngest said, "Mom, these (your cards) are so nice. I wish I could make them to give to you". I think that those are the nicest comments a mother could get.
And now...for the winner of the Give-Away from the Fantabulous Cricut Crawl...
Using the Random Number Generator: (1 - 73)
#42 Tanya said...
Cute project!! New follower:)
scrappylandusa.blogspot.com
Congratulations! Please email me (ddepre10@gmail.com) with your address so I can send you your goodies. Thanks. You have until Sunday to contact me.
Hoping that you have a wonderful rest of the day... leave me a comment (I love hearing from you).
...imagine what you could do.....
Hoping that you have a wonderful rest of the day... leave me a comment (I love hearing from you).
...imagine what you could do.....
Monday, April 18, 2011
Do The Bunny Hop
This week's Fantabulous Cricut Challenge is "Do The Bunny Hop" (Use a bunny or chick on your project).
Since Easter is just around the corner (on Sunday), I thought this would be a cute card:

 Can't you just eat that chocolate bunny up? I sure could!!!! I just LOVE chocolate......lol (Bet you do too!)
Finished Card: 4 1/4" x 5 1/2"
Materials:
Cardstock: White, Yellow, Yellow, Purple, Green, Brown, Blue, Pink and Three Different Patterned Papers (The Two Large Eggs and Background)
Cricut Cartridge Simply Charmed Bunny page 34 (Base) (I hid all the dotted lines with Design Studio)
Cricut Cartridge A Child's Year Easter 2 (Eggs) page 33 (Icon shift)
Inkssentials Glossy Accents
Fiskars Texture Plate Woodgrain
Ribbon
Mounting Tape
Computer Sentiment
Although my boys are grown, I still have an Easter Egg hunt every year. Don't let them tell you that they don't enjoy it...lol. If the weather is nice, I hide the eggs (plastic) outside; otherwise, it's in the house. I started making a map where I hide the eggs because it never fails, one egg ALWAYS escapes us. So I have to get the map out to find it...lol. (Before the map, we could spend days looking for it...hahaha) When all the eggs are found, they open their eggs and find the papers with money amounts on them and maybe a candy or two. Finally, they count up the amounts to see who wins. Part of their Easter present is to get the money they won...along with an Easter Basket with some candy. I think I have as much fun, if not more, than they do!
Do you have any traditions that you do? Leave me a comment, I would love to hear about it.
Thanks for stopping by...don't forget I'll be posting the winner tomorrow from my Fantabulous Cricut Crawl Give-away! Check back and see if you have won.
Til tomorrow...
imagine what you could do......
Since Easter is just around the corner (on Sunday), I thought this would be a cute card:


Finished Card: 4 1/4" x 5 1/2"
Materials:
Cardstock: White, Yellow, Yellow, Purple, Green, Brown, Blue, Pink and Three Different Patterned Papers (The Two Large Eggs and Background)
Cricut Cartridge Simply Charmed Bunny page 34 (Base) (I hid all the dotted lines with Design Studio)
Cricut Cartridge A Child's Year Easter 2 (Eggs) page 33 (Icon shift)
Inkssentials Glossy Accents
Fiskars Texture Plate Woodgrain
Ribbon
Mounting Tape
Computer Sentiment
Although my boys are grown, I still have an Easter Egg hunt every year. Don't let them tell you that they don't enjoy it...lol. If the weather is nice, I hide the eggs (plastic) outside; otherwise, it's in the house. I started making a map where I hide the eggs because it never fails, one egg ALWAYS escapes us. So I have to get the map out to find it...lol. (Before the map, we could spend days looking for it...hahaha) When all the eggs are found, they open their eggs and find the papers with money amounts on them and maybe a candy or two. Finally, they count up the amounts to see who wins. Part of their Easter present is to get the money they won...along with an Easter Basket with some candy. I think I have as much fun, if not more, than they do!
Do you have any traditions that you do? Leave me a comment, I would love to hear about it.
Thanks for stopping by...don't forget I'll be posting the winner tomorrow from my Fantabulous Cricut Crawl Give-away! Check back and see if you have won.
Til tomorrow...
imagine what you could do......
Sunday, April 17, 2011
Garden, Tulips and Veggie Tales
Between the rain and the wind this week, not a whole lot got done outside. However, I was able to get the garden cleaned out and the "cold" plants planted before the skies opened up.
 This is Romaine lettuce...
 spinach...
 onions that were from last year's garden...
 and also some left-over carrots.
I also planted some radish seeds.
Although my floral gardens are not ready yet, I have a few tulips that are blooming right now...

 Aren't they pretty?
I also made a birthday card with a "Veggie Tales" theme for my friend's grandson.


I designed it with the basics of Cricut Cartridge Freshly Picked. (sorry, no details)
Don't forget you have until midnight (EST) tonight to get into the give-away from the Fantabulous Cricut Crawl last Monday. (Click here).
Thanks for stopping by....leave a message and let me know what you think....
imagine what you could do....


I also planted some radish seeds.
Although my floral gardens are not ready yet, I have a few tulips that are blooming right now...


I also made a birthday card with a "Veggie Tales" theme for my friend's grandson.


I designed it with the basics of Cricut Cartridge Freshly Picked. (sorry, no details)
Don't forget you have until midnight (EST) tonight to get into the give-away from the Fantabulous Cricut Crawl last Monday. (Click here).
Thanks for stopping by....leave a message and let me know what you think....
imagine what you could do....
Saturday, April 16, 2011
Easter Treat Boxes
First, don't forget about my Give-away from the Fantabulous Cricut Crawl last Monday (click here).


Here are the treat boxes...

and a little closer...


Now I wish I could take credit for these ideas but I actually saw a version of them on two different blogs...the Chicks are from The Bug Bytes and the Carrots are from Small Bits of Paper. I made the Bunnies myself. I would like to thank you Ladies for your inspiration.
I actually made 6 Chicks, 6 Bunnies and 15 Carrots (5 each in 3 different papers). I plan on filling them with Chocolate Kisses in the Chicks and Bunnies and Jellybeans or M&M's in the Carrots. (I just have to get to the store and buy the candy).
Finished Chick and Bunny Boxes: 2 1/4" x 3 3/4" x 3/4"
Materials:
Cardstock: Patterned Paper, Cream, 2 Shades of Brown, Light Green, Purple, Yellow/Orange and Yellow.
Cricut Cartridge Wrap It Up Diploma (box) page 47, (Box)
Cricut Cartridge Simply Charmed Bunny page 34, (Base), Chick Egg page 35, (Shift Base, Layer 2 Shift, Layer 3 Shift and Layer 4 Shift)
Cricut Design Studio
Googly Eyes
Pink Pom Poms (for Bunny Noses)
Embroidery Floss (For Bunny Whiskers)
Green, Pink, 2 Shades of Purple, Blue and Maroon Ribbon
Pink Chalk (for Cheeks, Ears and Feet)
Black Le Plume II Pen (Thin) (for Bunny Mouths)
I used 4 Screens in Design Studio: (12" x 12" mat)
First Screen...To lay out 4 Boxes. Cut them out 3 times with 3 different Patterned Papers.
Second Screen...6 Bunnies (3 1/2") (3 on one 6"x 6"side and 3 on another. Use "Hide Selected Contour" for all the inside lines in the Bunnies. Cut them out in Cream, Light Brown and Dark Brown. (I cut them out in Green, which I didn't use.) I also have one extra Bunny in the other colors for another project).
Third Screen... 6 Shift Base Chicks (3 1/4") and 6 Layer 2 Shift (bottom layer of egg). (3 Chick Eggs on each of the top 6" x 6" squares and 3 bottom layer eggs each on the bottom 6" x 6" squares of the mat. Cut Chick Eggs in Yellow and the bottom layer eggs in Green and Purple)
Fourth Screen... 6 Layer 4 Shift (top layer of egg) and 6 Layer 3 Shift (Beaks) on another screen (2 eggs each on 3 of the 6"x 6" squares and the beaks on the last 6" x 6" square of the mat.
Finished Carrot Boxes: 1 3/4" x 2 1/2" x 1 1/8"
Materials:
Cardstock: 3 Different Patterned Papers and Clear Craft Plastic
Cricut Cartridge Tags, Bags, Boxes and More Cakebox, page 126 (Window Base)
Cricut Design Studio
Cuttlebug Embossing Folder Swiss Dots (for one carrot box)
Easter Grass
I used Design Studio to lay out 5 boxes on the screen (four in the corners and one in the middle). They were 4 1/2" each. I cut the Clear Craft Plastic to fit the on the inside of the boxes behind the windows.
I'm planning on giving them to my family on Easter when they come for dinner. I'm so excited....I can't wait! (I hope they like them as much as I do.)
I hope I inspired you to make these boxes as much as I was inspired when I saw them. Thanks again Ladies.
....imagine what you could do.....
Thursday, April 14, 2011
It's A Boy Card
At Scrappy Moms Stamps, the challenge this week was to use the Cricut Cartridge New Arrival. I came up with this card:

The inside is stamped with "Congratulations".

Finished Card: 4" x 9 1/4" (Fits in a business size envelope).
Materials:
Cardstock: Two Shades of Blue, White, Red, Green Yellow and Patterned Paper.
Cricut Cartridge New Arrival Plane page 118, (Base and Shift Base), "It's A Boy" page 90, (Base)
Cricut Design Studio
Cuttlebug Embossing Folder D'Vine Swirls
Inkadinkado Happy Everything Stamps "Congratulations"
Red, Green and Black Pigment Ink
Studio G Clear Stamps
Mounting Tape
Where I work, one of my Assistant Managers is pregnant and she is having a boy in June. I think I may give her this card. It's her first child. Hopefully, she'll like this card.
I used Design Studio to lay out three airplanes and the accessories, so I could cut them in different colors. Clockwise, the colors were: Blue, Red, Green and Yellow. I then played around and changed the colors so I would end up with three different airplanes. This is how I laid out the 12"x 12" mat:

I didn't glue the "extra" "It's a Boy" sentiments on the banner yet, because I thought that I could change it to "Happy Birthday" or "Congratulations" just in case I needed a different type of card. I also glued a piece of scrap cardstock behind the windows.
Hope you have a wonderful rest of the day. I have a friend coming over. I'm not sure what we'll be doing, but it doesn't matter since it's always nice spending time with a friend.
Don't forget about the give-away (click here). I'll be picking a winner on Tuesday the 19th. Good luck!
I would love to hear from you here also. Your comments are always appreciated. Thanks.
Until the next post....imagine what you could do.....
Tuesday, April 12, 2011
Pretty Princess and 100 Followers
Wow! I can't believe it...over 100 followers. I'm so excited. Thank you so much.
I made this card for the challenge at Two Scraptastic Gals (use Storybook or Wrap It Up cartridges) and Die Cuttin' Diva's (use two different cuts from two different cartridges).

This is the inside:

Finished Card: 4 1/4" x 5 1/2"
Materials:
Cardstock: White, Three Shades of Pink, Purple and Patterned Paper
Cricut Cartridge Wrap It Up Castle page 24 (Base, Shift Base, Layer and Shift Layer)
Cricut Cartridge Mini Monsters Pretty Princess page 47 (Phrase and Shift Phrase)
Fiskars Clear Stamps Put On Your Party Hat "Happy Birthday"
Glitter
Queen and Co Pearls Orchid
Mounting Tape
I don't normally have a chance to make a "girly" card (I have all sons), so I thought this cut would be fun. And since it is "girly", I had to add the glitter. I think it turned out really pretty.
I also thought I would share this other card that I made...not for any particular reason except to have it in my stash .


Finished Card: 4 1/4" x 5 1/2"
Materials:
Cardstock: White, Green, Brown, Cream, Pink, Orange/Yellow and Patterned Paper
Cricut Cartridge Sweet Treats Ice Cream 6 page 35, (Base, Base Shift, Layers, Layers Shift and Shadow/Blackout Base)
Sizzix Embossing Folder Plaid
Cuttlebug Embossing Folder D'Vine Swirls
Fiskars Texture Plates Fabric
Queen and Co Pearls Orchid (4)
Inkssentials Glossy Accents
Mounting Tape
Computer Sentiment
Hope you like the cards. Leave me a comment. I would love to hear from you. Thanks.
Also, check out the Fantabulous Cricut Crawl here or just my part here. I have a give-away there. You have until Sunday night the 17th at 11:59 PM to become a follower and leave a comment on that post. Good luck!
imagine what you could do....
Monday, April 11, 2011
Fantabulous Cricut Crawl Spring Fling and Give-Away!
Hi, my name is Dana and welcome to the fifth Fantabulous Cricut Challenge Blog Crawl Spring Fling! (Their version of a blog hop). You are at "imagine what you could do". If you just happened to find my blog and you would like to play along, please start here at Fantabulous Cricut. Otherwise, if you have come from Barb's at http://bugbites411.blogspot.com/, you are on the right trail.
At Fantabulous Cricut, we are having a Spring Fling! Each Design Team member will feature an original Spring Project that includes Pink, Green and Yellow on it with at least one Cricut cut. Make sure you check out all the member's blogs for inspiration and there will be some Prizes along the way. There will also be a Grand Prize at Fantabulous Cricut Challenge Blog for someone that submits a Spring Fling Project!
Here is the complete list of blogs, in case you get lost along the way...
1. Amy http://lv2scrapandfibrofacts.blogspot.com/
2. Audrey http://www.paperartbyaudrey.com/
3. Barb http://bugbites411.blogspot.com/
4. Dana http://iwycd.blogspot.com/ (THAT'S ME!)
5. Evanna http://evannas-paper-palace.blogspot.com/
6. Helen http://www.craftingcricutmom.com/
7. Jenae http://justjenae.blogspot.com/
8. Jennie http://earthyscrap.blogspot.com/
9. Kate http://smallbitsofpaper.blogspot.com/
10. Larelyn http://handmadefromtheheart-designsbylarelyn.blogspot.com/
11. Lisa C. http://lisa-craft-blog.blogspot.com/
12. Lisa N. http://prettypaperprettyribbons.blogspot.com/
13. Maquel http://papermaineiac.blogspot.com/
14. Marlene http://scrappincookie.blogspot.com/
15. Rae http://wahoocrafts.blogspot.com/
16. Robin http://robinscreativecottage.blogspot.com/
17. Sandee http://sandeeallen.blogspot.com/
18. Sarah http://sarahvaitstamps.blogspot.com/
19. Saundra http://luvscrappingtogether.blogspot.com/
20. Tamara http://happylifecraftywife.typepad.com/blog/
21. Tanya http://nonnascraftcorner.blogspot.com/
Now that we have that out of the way, here is my project:
It's a double sided banner AND some boxes to hold some Easter candy or little trinkets.

This side of the banner says "Spring".

This side says "Easter".
Here is a close-up of each side: (It looks much nicer in person!)


This is a closer picture of three of the boxes:

For the Double-sided Banner:
Finished size: 3" tall and 21" long (from each end of the ribbon)
Materials:
Cardstock: Yellow, Pink, Green and Patterned Paper
Cricut Cartridge George and Basic Shapes Oval 1 page 114, (Base Shift)
Cricut Cartridge Opposites Attract "E""A""S""T""E""R""S""P""R""I""N""G" various pages, (Upright Shift)
Cricut Design Studio
Sizzix Embossing Folder Snowcap
Cuttlebug Embossing Folder D'Vine Swirls
Ribbon Hole Punch
Ribbon
I cut the letters out at 1 1/4" in two different colors. I cut out six 3" ovals in Yellow and six in Green. I cut six 2 3/4"ovals in Pink and six in Patterned Paper. I embossed the Patterned Paper ovals with D'vine Swirls and the Pink ovals with Snowcap. Layer and glue the Pink ovals on the large Yellow ones and the Patterned paper ones on the Green ovals. Glue each letter on a different oval, spelling out each word on the two different types of ovals. Lay out the ovals with "Easter" on them. Directly underneath, line up the ovals with "Spring". Now glue the "E" in Easter to the back of the "G" in Spring. Continue with the "A" to the back of the "N", the "S" to the "I", the "T" to the back of the "R", the "E" to the back of the "P" and finally, the "R" to the back of the "S". Punch ribbon holes in the top of the ovals. Layout the ovals with "Easter" spelled out, then run the ribbon through the holes. Tie loops to each end to hang. Now you should have a two-sided banner.
For all the Boxes:
Finished Size: 3" x 5" x 1"
Materials:
Cardstock: Yellow, Green and Pink.
Cricut Cartridge Wrap It Up Robot (Box) page 40 (Box Base)
Cricut Cartridge Simply Charmed Bunny page 34 (Shadow Box)
Cricut Design Studio
Clear Craft Plastic
For the first box to the left: (Yellow)
Sizzix Embossing Folder Pepperment Twist
Studio G Clear Stamp "Happy Easter"
For the second box: (Green)
Cuttlebug Embossing Folder Bloom Dots
Nicole Stickers # 352 (Easter Eggs)
For the third box: (Pink)
Sizzix Embossing Folder Paisley
Studio G Clear Stamps "Happy Easter"
Scrap of cardstock to fit around the box
For the fourth box: (Yellow)
Ribbon
For the fifth box: (Green)
Sizzix Embossing Folder Spring Flowers
Sizzix Tim Holtz Alterations Tattered Florals - Smallest Flower
Inside scrap form Marigold cut from Cricut Cartridge Freshly Picked
Small Gold Brad
For the last box: (Pink)
Ribbon
On Design Studio, weld the bunny from Simply Charmed to the front panel of the box. Cut out. Score the fold lines. Emboss with folder of your choice, if desired. (Note: you will have to do half of the box at a time). Fold and glue box together. Cut a piece of Clear Craft Plastic (2 3/4" x 3"). Glue behind the bunny. This will also make the box sturdier. Decorate the outside as you like.
Now how would you like to win something? WOO HOO! This is what I am offering:

A Cuttlebug Embossing Folder (Stylized Flowers), Queen and Co. Pearls (Grass Green), Queen and Co. Rhinestones (Orchid), Four (4) sets of Studio G Clear Stamps and a sheet of Nicole Stickers (Easter Eggs).
In order to be eligible to win, you need to be a follower of my blog, leave a comment on THIS post by 11:59 pm EST April 17th AND leave me a way that I may contact you. I will pick a winner on Tuesday April 19th. Good luck!
It's your turn now. Show us your Spring Fling Project. Link it to Fantabulous Cricut Crawl (here). Don't forget to use Pink, Yellow and Green and at least one Cricut cut on your project. Have fun!
Now go to the next stop on the crawl which is Evanna at http://evannas-paper-palace.blogspot.com/. Enjoy the rest of the Crawl and don't forget to play along!!!
Thanks for stopping by...
imagine what you could do......
Sunday, April 10, 2011
April Showers Bring May Flowers at the Paper Variety Challenge
The theme for this week at The Paper Variety is "April Showers Bring May Flowers". The challenge was photo inspired...you could use any element, like the umbrella or rain boots or the color combination black/blue/yellow.
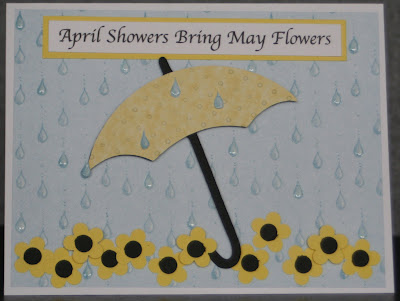

Here is my card:

This is the inspiration:
Finished Card: 4 1/2" x 5 1/2"
Materials:
Cardstock: White, Yellow, Black and Patterned Paper
Cricut Cartridge Forever Young Umbrella page 44, (Base and Shift Base)
Cuttlebug Embossing Folder Swiss Dots
Small Flower Punch
Hole Punch (for the flower centers)
Inkssentials Glossy Accents
Mounting Tape
Computer Sentiment
I cut out a few extra raindrops, put glossy accents on them and glued them on the umbrella. On the inside, I placed three (3) flowers in the bottom left corner. I was able to use the color combination, in addition to the umbrella. I think it turned out pretty nice.
Now I'm all for the rain to help the plants grow, but hey, enough is enough already. Right now, I think I'll chant " Rain, Rain, Go Away, Come Again Another Day!" My yard could stand to dry out ...maybe just a little.
Hope the rain doesn't deter you from doing anything...well, if you have to stay inside, then craft a little...maybe it will make you feel a little more sunnier.
I would love to hear your comments...thanks.
imagine what you could do.....
Saturday, April 9, 2011
Bunch of Flowers...Happy Easter

CropStop is having a sketch challenge this week. This is the sketch:

Finished Card: 4 1/4" x 5 1/2"
Materials:
Cardstock: White, Pink, Yellow, 2 Shades of Green, 2 Shades of Purple
and Patterned Paper
Cricut Cartridge Walk In My Garden Cornflower page 86, (Base) and Stem 2 page 103 (Base Shift)
Spellbinders Nestiabilities Labels Four (Second and Third Largest)
Cuttlebug Embossing Folder D'vine Swirls
EK Success Corner Rounder
Martha Stewart Glitter Black
Studio G Clear Stamps "Happy (Bunny) Easter"
Queen and Co Pearls Grass Green and Orchid (Two of each, Small, Medium and Large)
Black Pigment Ink
Pink Ribbon
Mounting Tape
I also made another version:

Finished Card: 4 1/4" x 5 1/2"
Materials:
Cardstock: White, 2 Shades of Purple, 2 Shades of Green, Yellow and Patterned Paper
Cricut Cartridge Walk In My Garden Cornflower page 86, (Base) and Stem 2 page 103 (Base Shift)
Spellbinders Nestiabilities Labels Four (Second and Third Largest)
Small Flower Punch
Martha Stewart Flocking Powder Black
Studio G Clear Stamps "Spring Has Sprung"
Black Pigment Ink
Queen and Co Pearls Nightfall (3)
Yellow Ribbon
Purple Ribbon
Mounting Tape
I really like the way these cards turned out. Very Springy, I think. The sun was shining for a change today...maybe that's what inspired these cards. I also got a chance to go out to the vegetable garden and pull out all the dead stuff. (Yuck....) I found that I had some leftover vegetables from last year...a couple of carrots and a half dozen onions. Can't wait to get this year's crops started. I also got to plant some red Petunias in a pot for the front porch. Actually feel like I accomplished something this Saturday!
Well, enjoy the rest of the day...whether it is crafting, reading or gardening...imagine what you could do
Easter Bunny
The challenge this week at Cricut Cardz Challenge is to make a project, card or layout for Easter. Here is my card:

Finished Card: 4 1/4" x 5 1/2"
Materials:
Cardstock: Yellow, Green, Purple, White, Black and Patterned Paper.
Cricut Cartridge Paper Doll Dress Up Magician page 40, (Accessories 3 Base)
Cricut Solutions Cartridge Soccer Grass (Button 15)
Martha Stewart Garden Trellis Deep Edge Border Punch
Small Flower Punch
Clear Rhinestones (10)
Gray and Pink Chalk
Inkssentials Glossy Accents
Mounting Tape
The inside has green cardstock (that matches the grass...you can see it peeking through the trellis) and a computer sentiment "happy easter". I think this is a really cute bunny. (I also really like the Simply Charmed bunny).
Hope the Easter bunny visits your house this year...and eat a chocolate egg for me...enjoy...
Join the fun and create something for a challenge...just imagine what you could do....
Friday, April 8, 2011
Cupcake From My Kitchen
Quick post...There is a challenge at at Two Scraptastic Gals/More Than Favors (click here) to use From My Kitchen Cricut Cartridge. I think this is a great cut of a cupcake:

Finished Card: 4 1/4" x 5 1/2'
Materials:
Cardstock: Blue, Light Blue, Brown, Tan, Red, Black, Green and Patterned Cardstock
Cricut Cartridge From My Kitchen Cupcake page 61, (Base, Base Shift, Layers Base, Layers Shift and Shadow/Blackout Base)
Cuttlebug Embossing Borders Pop Culture (Diamond Border)
Computer Sentiment
Large Red Button
I cut off the leaf portion of the cherry on the base cut and the shadow. On the inside, I mimicked the black and green boxes with "Enjoy".
Hope you like the card and maybe you will think about using this cupcake...imagine what you could do....
Tuesday, April 5, 2011
Feel Better Soon
Just a quick post today. I was in AC Moore the other day and I saw these Sticko face stickers. I immediately thought that I wanted to make this card.


Finished Card: 4 1/4" x 5 1/2"
Materials:
Cardstock: Cream, Green and K & Company Patterned Cardstock Cards (Amy Butler)
Sizzix Tim Holtz Alterations Tattered Florals (3rd largest flower)
Sticko Classic Stickers Birthday Faces
Inkadinkado Happy Everything Stamp Set (Feel Better Soon)
Blue Pigment Ink
Mounting Tape
I cut out two flowers in cream and then shaded them with the blue pigment ink. I made one darker than the other, then I layered them with a piece of mounting tape. I cut a small dot (trying to make it about the same size as the sticker) and put it on the back of the face sticker, then again using mounting tape, I layered that on the top of the flower. The green and cream strip is two pieces of cardstock. I inked the sides of the sentiment and used mounting tape to place on the card.
Isn't it funny where you can find inspiration? Well, I don't think it matters where you find it, just run with it and start creating, cause imagine what you could do.....
Sunday, April 3, 2011
Cricut Cardz Challenge...
I was thinking a little outside of the box on this one (I think anyway). The challenge at Cricut Cardz Challenge was "to see a house image from any cartridge, a touch of lace and a flourish. You can make your cards using any colors you'd like".

This is what I came up with:

My house is the beehive, the lace is behind the "honeycomb lace" and the flourish is the bee flying line.
Finished Card: 4 1/4" x 5 1/2"
Materials:
Cardstock: White, Yellow, Black, Patterned Paper and Clear Craft Plastic ( for the Bee's Wings)
Cricut Cartridge Create-A-Critter Bee page 68, (Base, Layer 1 Base, Accessory Base and Accessory Shift)
Cricut Cartridge George and Basic Shapes Octagon page 107 (Silhouette Shift)
Cricut Cartridge Wall Decor and More Clock (Flourish) page 67 (Font Base)
Cricut Design Studio
Cuttlebug Embossing Folder Tiny Mosaic
Lace
Brown Chalk
Cricut Cartridge George and Basic Shapes Octagon page 107 (Silhouette Shift)
Cricut Cartridge Wall Decor and More Clock (Flourish) page 67 (Font Base)
Cricut Design Studio
Cuttlebug Embossing Folder Tiny Mosaic
Lace
Brown Chalk
Mounting Tape
Hope you like my interpretation of a house. It's a fun card for a fun challenge.
Would love to hear your comments. Thanks.
imagine what you could do.......
Yum...Challenge at The Paper Variety
Thought this was a fun challenge at The Paper Variety. Recipe Challenge 1-2-3. You choose.
Here is my card:

My recipe is: 1-Word, 2-Scoops of Ice Cream and 3-Pink Pearls.
Finished Card: 4 1/4" x 5 1/2"
Materials:
Cardstock: White, Pink, Cream, Brown, Yellow/Orange and Patterned Paper
Cricut Cartridge Sweet Treats Ice Cream 6 page 35, (Base, Base Shift, Layers and Layers Shift)
Cricut Cartridge George and Basic Shapes "Y""U""M" various pages, (Base)
Sizzix Embossing Folder Plaid
Cuttlebug Embossing Folder D'Vine Swirls
Queen and Co Pearls Orchid (3)
Inkssentials Glossy Accents
Mounting Tape
I just thought this looked so yummy. Hope you do too.
Leave a comment...I always love to hear from you. Thanks.
imagine what you could do......
Subscribe to:
Posts (Atom)