Saturday, January 29, 2011

Lollipop Cards

Well, as you can see, I drifted down from the ceiling, (lol), and I am writing my second post for today.

After seeing Robin's " Lolli Pop Shape Cards", (Robin's Creative Cottage), I made these:


I used lollipop sticks, plastic candy wrappers (rather than cellophane) and I think mine are smaller than Robin's. I hope she likes my version.

Finished Card: 2 1/2" x 5 1/4" (including stick)

Materials:
Cardstock: Various Patterned Paper and White
Cricut Cartridge Accent Essentials Accent 1 (Circle) page 32 (Base Shift), Accent 19 (Swirl) page 50 (Base)
Lollipop Sticks
Candy Wrappers
Ribbon
Crystal Clear Glitter
Computer Printed Sentiment "So Sweet"
Pigment Ink (Various colors to ink around sentiment)

I thought these were just so adorable. You could use them for birthdays, baby showers, etc. Just change the paper...imagine what you could do....

I WON...Cupcake Challenge for CardzTV

                          
I can't believe it. I was going to start writing up a new post, but thought I would first check what was new on the dashboard. I clicked on CardzTV's new post "Cupcake Challenge Winner". My son came in to talk to me when I hit the play button for the video, so we watched it together! I thought I was hearing things when she said my name. I turned to Jeff and he says "Mom, you won!"

I can't say "Thank you" enough! (Click here to see the card I made).

As soon as I come down off the ceiling, I'll write up my other post.

Take a chance....you never know....imagine what you could do

Thursday, January 27, 2011

Three Quick Cards

I just bought the Cricut Seasonal Cartridge Spring Holiday Cards and started to play around with it. I made the cuts with just plain cardstock but didn't like the way it looked. Next, I tried just patterned paper, but didn't like that either. I even tried plain cardstock on patterned paper and still, I didn't like that. Finally, I combined plain cardstock, patterned paper, plain cardstock and patterned paper. This combination I finally liked. What do you think?


Finished Cards: 4 1/2" x 5 1/2"

Materials:
Cardstock: Cream, White, Green, Purple and Patterned Paper (Three Different Prints)
Cricut Cartridge Spring Holiday Cards "Cute" Card (Buttons 8, 40 and 44), "Irish" Card (Buttons 14, 39 and 45), and "Easter" Card (Buttons 21, 35 and 46)

For a fairly quick and easy card, these are cute. I imagine that by using Design Studio, you could make some different layers. I may just have to give it a try.... Has anyone else tried this cartridge? What did you think? Leave a comment and let me know...Thanks.

Create...imagine what you could do......

Game Controller Pillow Box


Second post for today...
My best friend's son's birthday was last Sunday. He turned 12 and he loves playing video games. I saw this controller and thought it would be perfect for his gift.

Finished Project: 4" x 2 3/4" x 1"

Materials:
Cardstock: Black, White and Rust
Cricut Cartridge Wrap It Up Game page 30 (Base, Layer and Shift Layer)
Design Studio
Cuttlebug Embossing Folder Spots and Dots
Mounting Tape

Have fun....imagine what you could do....

Three Challenges ...One Card

Today I thought I would try to put three challenges into one card...first, here is my card: (It's hard to see on the photo but the sentiment reads: " Good Friends are like Stars...")


 and the inside: ("You don't always see them, but you know they are always there")


 The challenges are PaperCraft Star Challenge 30 (click here) Scraplift any project on any current PaperCraft Star Design Team Member's  Blogs; The Paper Variety (click here) Friendship Challenge! There is a quote to use or inspire and the last challenge is CropStop Challenge #4 (click here) Make a Good Impression! Use 2 different patterns of embossing.

For PaperCraft Star, I scraplifted Tracy's card from Challenge #29 (click here to see her card). I used the actual quote from The Paper Variety...although, I split it between the front and the inside. For CropStop, I used actually 3 different embossing folders and I wet embossed the star.

Finished Card: 4 1/4" x 5 1/2"

Materials:
Cardstock: White, Two shades of Pink, Green and Patterned Paper
Sizzix Flower # 1
Cuttlebug Embossing Folder Swiss Dots
Cuttlebug Embossing Folder D'Vine Swirls
Sizzix Embossing Folder Spring Flowers
Tim Holtz Distress Powder Peeled Paint (Green) (embossed a gold star to green)
Olive Green Chalk
White Sheer Ribbon
Queen and Co Pearls Grass Green Six Pearls Two Large, Two Medium and Two Small
Computer Printed Sentiment Basque 12 in Rose
Mounting Tape

Hope that you like this card. It was fun putting the three challenges together. 

We ended up getting at least 10 inches of snow. It's beautiful to look at, but.....well, the dogs like it...hahaha. Guess it's time to get back outside and shovel some more...woo hoo (not). The plows just finally came down our street...the driveway will be a mess again. Oh well....

Leave a comment...Thanks, I always love reading your thoughts. Take some time and do some crafting...imagine what you could do...

Tuesday, January 25, 2011

Scappy Mom Stamps Terrific Tuesday Challenge - Sweethearts!

This week at Scappy Moms Stamps (click here), the challenge is Sweethearts. Now I personally do not own the Cricut Cartridge Sweethearts, however, I do have the Cartridge Tie The Knot. I thought that it would be similar enough. I made the petal box with valentine cardstock.


I cut a heart window using Cricut Design Studio, so you can see the goodies inside. At the top, I added four (4) hearts with a contrasting cardstock.

Finished Size: 2 3/4' x 2 3/4" x 2 1/2"

Materials:
Cardstock: Patterned Valentine Paper
Cricut Cartridge Tie the Knot Petal Box page 69 (Base), Love (Heart) page 54 (Base Shift) 
Cricut Design Studio
Acetate (for heart window)

I was planning on making a few of these to give to my three (3) sons for Valentine's Day (I always give them just a little something), however, I'm not really that pleased with the way it folds together. I feel like the sides keep collapsing in on themselves. I guess I'm more of a traditionalist and like boxes that have sides. Now don't get me wrong, I like it, I just don't love it. Hey, but it was worth trying...at least once. (lol) Back to the drawing board...

Try something new...what's the worst that can happen? You ruin a piece of paper?...big deal! It's worth the risk...hey, you just might find that you love it...

Leave me a comment (become a follower) and tell me if you have ever made the petal box and what you thought of it....I really would love to know...Thanks...imagine what you could do......................

Monday, January 24, 2011

Two Different Challenges...One Basic Card...Two Different Looks

The first challenge is Fantabulous Cricut Challenge #44 Neglected Cartridges (click here) ...Make a project using a cartridge that you haven't used in 6 months. The other challenge is for Robyn at The Pink Stamper. Today is her birthday, (Happy Birthday Robyn), and she challenged everyone to make a birthday project. (Click 
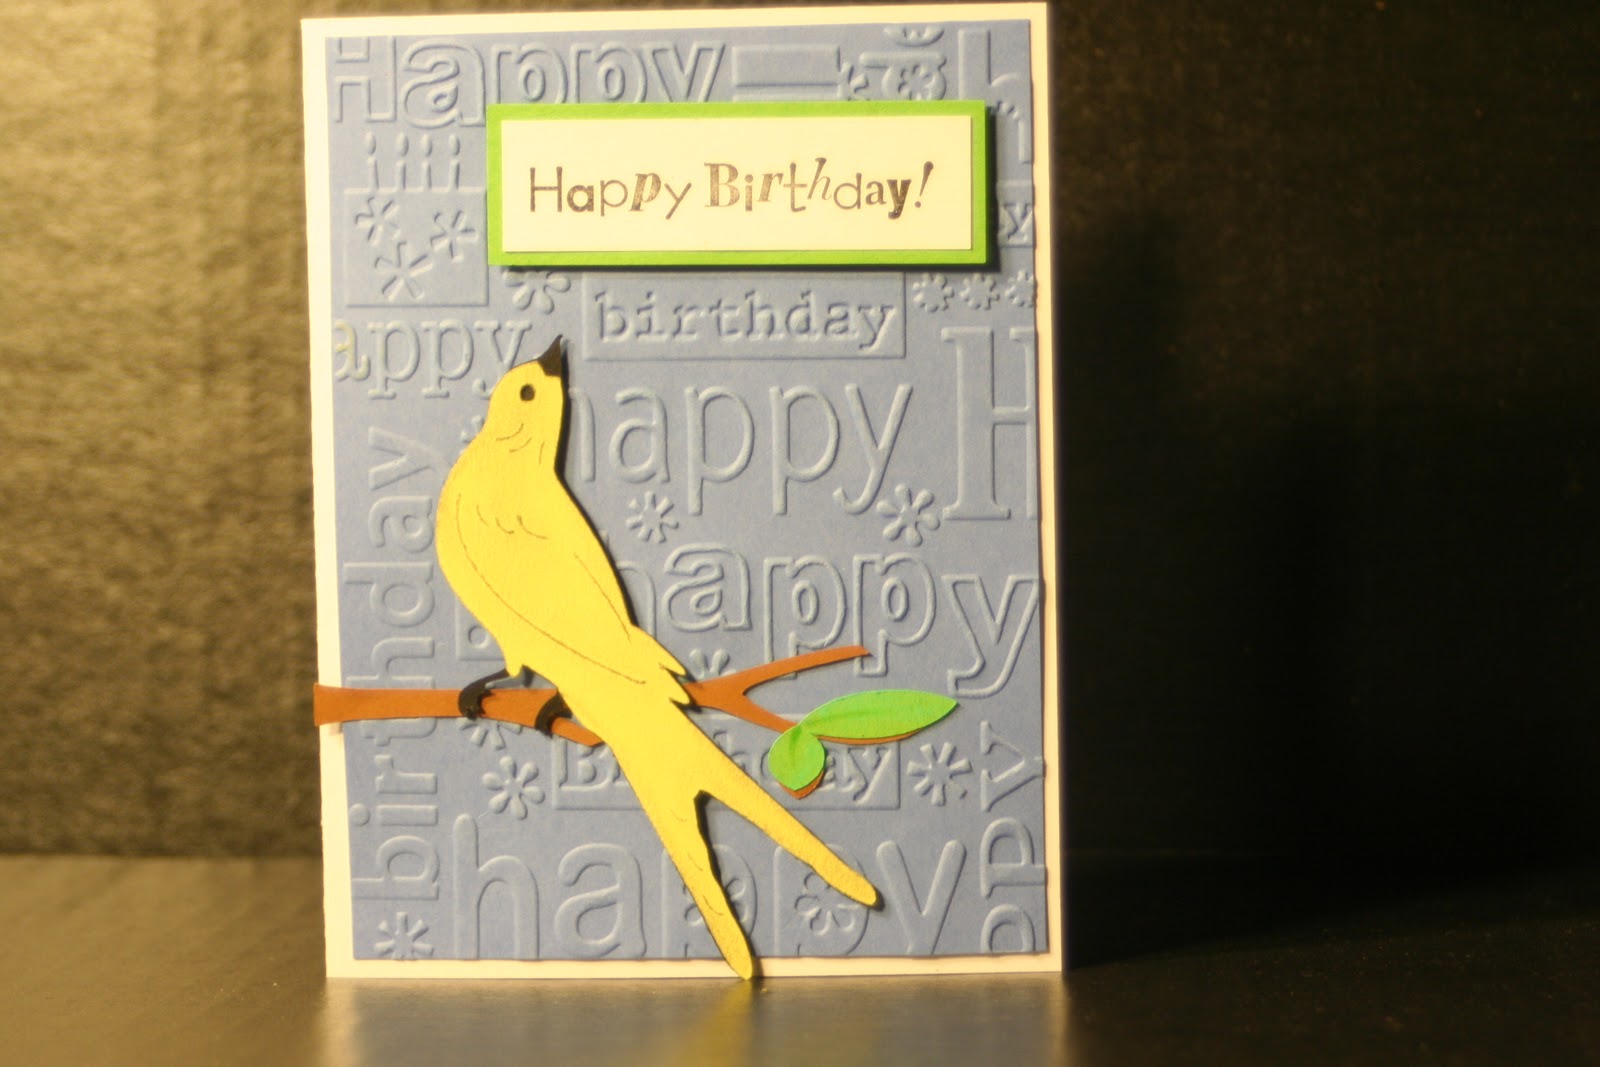
here). Here is my card:


I also made the same basic card, just changed the paper a little bit.


I like both of them. What do you think?

Finished Card: 4 1/4" x 5 1/2"

Materials: (first card)
Cardstock: White, Red, Yellow, Brown, Black, Green and Patterned Paper
Cricut Cartridge 50 States Oklahoma State Bird page 48 (Base Bird and Shift Bird)
Cricut Cartridge Create-A-Critter Owl (Branch) page 25 (Base Accessory and Shift Accessory)
Cricut Cartridge George and Basic Shapes Square1 page 109 (Shift Silhouette)
Cricut Design Studio
Inkadinkado Happy Everything Stamps "Happy Birthday"
Black Pigment Ink
Mounting Tape
Chalk (to show the lines on the bird)

Materials: (second card)
Cardstock: White, Blue, Yellow, Brown, Green and Black
Cricut Cartridge 50 States Oklahoma State Bird page 48 (Base Bird and Shift Bird)
Cricut Cartridge Create-A-Critter Owl (Branch) page 25 (Base Accessory and Shift Accessory)
Cricut Design Studio
Cuttlebug Embossing Folder Happy Birthday
Inkadinkado Happy Everything Stamps "Happy Birthday"
Black Pigment Ink
Mounting Tape
Chalk

My neglected cartridge is 50 States. I used it probably a year ago, or more, when I was making a scrapbook for my son, but haven't touched it since. It really has some beautiful images of different birds, as well as different flowers. If you have this cartridge, I would take another look at it.

The bird image is a little more realistic rather than a "cutesy" one, and works well for an adult's birthday card. I like both styles...just depends on what your needs are at the time.

Thanks for taking the time to look...I appreciate it...If you are not a follower yet, please think about becoming one...I'd like to have a give-away once I reach 50 followers. If you are one already, thanks! Leave a comment and let me know what you think.....imagine what you could do

Sunday, January 23, 2011

The Paper Variety Week 17 Sketch Challenge

For this challenge at The Paper Variety (click here for their website), I made a layout. Now I'll be honest, I haven't been making many layouts lately, basically because I just prefer making cards. The challenge was to make a card, layout or other paper project using the sketch below:

Here is my layout:


Finished Layout: 12" x 12"

Materials:
Cardstock: Embossed Blue, Teal, Green, Purple, Orange and Patterned Paper
Cricut Cartridge Cupcake Wrappers Scallop (Girly) (Button 37 Shift Toppers)
Cricut Cartridge Cindy Loo "Best Friends" welded
Cricut Design Studio
EK Success Scallop Circle Punch
EK Success 1 1/4" Circle Punch
Cuttlebug Embossing Folder Swiss Dots
Sizzix Embossing Folder Plaid
Mounting Tape

My best friend's name is Trish. We have been friends for, well, over 30 years (geez, it really has been that long, hasn't it?) We have been through just about everything...good and bad, happy and sad, and everything in-between. I don't know what I would do without her. I'm glad that she is in my life.

I hope everyone has a best friend. I think friends are important to have. In addition to Trish, I have several other good friends that I treasure. I really feel that my life is blessed with my friends.

Challenge yourself...whether it is to make a card or a layout or talk to someone new and become a friend...just imagine what you could do.....

Saturday, January 22, 2011

Another Two Challenges...CropStop and Cardz TV


I made this card for two challenges. CropStop Challenge #3 Squares and Die Cuts. Click here to check it out. (Basically, make a square card with a die cut on it). The second challenge is for Cardz TV. Cupcake Challenge! Click here to read about this one. (Make a card with a cupcake on it).

Finished Card: 5" x 5"

Materials:
Cardstock: White, Brown, Pink, Green and Patterned Paper
Cricut Cartridge Sweet Treats Cupcake 1 page 24 (Base Shadow/Blackout and Shift Shadow/Blackout), Cupcake 4 page 27 (Shift Base, Base Layers)
Cricut Cartridge Cindy Loo  "sweet" (each letter, Base Font)
Cricut Design Studio
Glitter Glue Clear
Cuttlebug Embossing Folder D'Vine Swirls
Studio G Pigment Ink (Lime Green) (Around edge of card)
Three (3) Clear Rhinestones, small, medium and large
Mounting Tape

Here is a different view:

I use Design Studio to make the cupcake because honestly, I don't like how high the "paper" comes up on the original image...so, I cut it shorter. I hope you are able to see all the glittery details...swirls, paper and letters. I used only one type of glitter glue (it's missing the label, sorry), but it shows up differently on each type of paper.

Leave a comment...and don't forget to become a follower...I would love to have a give-away when I reach 50 followers. (Plus, I just love hearing from you...thanks!)...imagine what you could do......

Wednesday, January 19, 2011

Papercraft Star Challenge 29 - Color Challenge and Recipe


The challenge this week at Papercraft Star is a color challenge and a recipe. (Check it out here). Here are the directions:   
and the colors:
colors for Challenge 29 
I used the lighter and darker teal and a version of the orangey-brown for the colors. For the recipe, I used a die cut (Dragonflies, Kanji word and Friend), wet embossing (on wings), and a stamped image (Dragonflies in the background). I don't think the photo shows the glossy, shiny wings very well...unfortunately.

Finished Card: 4 1/4" x 5 1/2"

Materials:
Cardstock: Dark Teal, Light Teal and Pumpkin
Cricut Cartridge Pagoda Dragonfly page 43 (Base), Panda 2 (Friend and Kanji Word) page 36 (Kanji Word Base and Kanji Base)
VersaMark Watermark Stamp Pad
Clear Embossing Powder
Inkadinkado Clear Stamps Patterned Bugs (Dragonfly)

I'm hoping to send this card to a friend that I haven't seen in a while. I left the inside blank, so I could write a personal message. 

I've also been trying to keep one of my other craft resolutions...aside from trying new products and techniques, I wanted to try to use different Cricut cartridges in my cards and projects. Since the beginning of the year, I have used twelve (12) cartridges. Not too bad. 

Leave a comment...(I love reading them)...become a follower (I'm thinking about a give-away when I reach 50 followers)...and challenge yourself in different ways...
imagine what you could do.....

Tuesday, January 18, 2011

My Very First Blog Award


I can't believe it...WOO HOO. I am so excited. Today I received the STYLISH BLOG AWARD.

It's my first award. Thank you to Pat at Pat's Scraps. (Click here to see her blog).

This is how it works:
When you accept the award, you must:
1. Thank and link back to the person who gave you the award.
2. Share 8 things about yourself.
3. Pay it forward to 8 bloggers that you have recently discovered.
4. Contact those bloggers and tell them about their award.


 Ok, so let's see...eight (8) things about myself....hhhhmmmmmmm
1. My family is everything to me...and that includes my family of friends and my furry family.
2. I feel that I am blessed everyday.
3. I love birds. I first fell in love with hummingbirds when I lived in California...watching them outside our livingroom window at the lemon tree.
4. I love to garden (hate weeding). I have both vegetable and floral.
5. I have an eclectic style.
6. I would like to travel to Ireland, Germany, Switzerland, France, and Italy and take a cruise to the Caribbean.
7. I always try to see the positive...you know, glass half full...
8. I love the theater.

Now that was a little harder than I thought.

Next, forward this award to 8 other bloggers....now I'll be honest, these are blogs that have inspired me the most...(in no particular order)
1. Going Buggy http://going-buggy.blogspot.com/
2. Cardz TV http://www.cardztv.blogspot.com/
3. Small Bits of Paper http://smallbitsofpaper.blogspot.com/
4. Capadia Designs http://www.capadiadesign.com/
5. Creations With Christina http://www.creationswithchristina.com/
6. Robin's Creative Cottage http://robinscreativecottage.blogspot.com/
7. Lisa's Craft Room http://momtooneson.blogspot.com/
8.She's a Sassy Lady http://shesasassylady.blogspot.com/

Again, that was harder than I thought it would be.....
(I must say that the challenge blogs are very inspirational also, but I didn't think they qualified for the award).

Well that just made my day. Thanks again.
Imagine what you could do......

Two Challenges in One Card

This is the first time I have done this...used one card for two challenges. Here is the card:


The first challenge is CropStop Challenge # 2 - Add Some Stickles or Glitter Glue on your project. Click here. I used it on the swirl.
The second challenge is Fantabulous Cricut Challenge # 43 Sweet Shop - Incorporate something sweet on your project. Click here. The cupcake would be something sweet..don't you think? lol
I think I accomplished it.

Finished Card: 4 1/4" x 5 1/2"

Materials:
Cardstock: White, Green, Pink, Brown and Patterned Paper
Cricut Cartridge Sweet Treats Cupcake 1 page 24 (Base, Shift Layers and Base Shadow), Cupcake 4 page 27 (Shift Base, Base Layers)
Cricut Design Studio
Cuttlebug Embossing Folder D'Vine Swirls
Ranger Stickles Lime Green
Computer Printed Sentiment on Front and Inside

I follow quite a few blogs and I notice that many of them do more than one challenge at a time. It was fun trying to put altogether...although these were not real difficult. Maybe I'll try it again...yeah, probably.

Leave a comment and tell me how many challenges you have ever used one card for...would love to hear about it...thanks. Imagine what you could do.........

Monday, January 17, 2011

The Paper Variety Challenge: TPV is Going PINK!

I haven't posted anything since last Thursday since I have been busy...kind of. I spent the rest of Thursday cleaning up my craft area. I think I have told you that I am a little of a messy crafter when I craft, especially if I am feeling inspired. Well, I was at the point that I think I had about a 6 inch by 6 inch spot to craft in. Kind of hard to do anything with. So I had to reorganize...putting paper away, stamps, punches etc. I also reorganized my cartridges. Anyway, on Friday I wasn't around as I went to New York City for the day with middle son and my youngest son and two of his friends. Visited the Museum of Modern Art...very inspiring. Saw a off-Broadway play...a little different, but good. Very, very nice day, however, very tiring and cold. Spent the weekend not doing too much except recuperating and household things.

So, enough of the small talk...This is the my card for this week for The Paper Variety:


and the inside:


This is the challenge: (Click here).


 Finished Card: 4 1/4" x 5 1/2"

Materials:
Cardstock: Hot Pink, White and Black
Cricut Cartridge Paper Lace Heart 1 page 30 (Base), Heart 2 page 40 (Base Shadow) and I Love U 2 page 70 (Base and Base Shadow)

Cricut Design Studio
Marthat Stewart Glitter Kunzite
Craftsmart Stamp (Cluster of Hearts)
Studio G Clear Stamps (Heart and "Be Mine")
White Pigment Ink
Black Pigment Ink
White Gel Pen
Pink Ribbon
Mounting Tape

Originally, I was trying to only use Pink and Black, but it definitely needed something else to break up the design. I like the way this turned out.

Hope you like...leave a comment...I always love reading them. Thanks, in advance. Imagine what you could do.....


Thursday, January 13, 2011

Scrappy Moms Stamps...1st Ever Terrific Tuesday Challenge - Birthday Bash!

On Tuesday, I came across this website, Scrappy Moms Stamps, and thought I would try the challenge. Use Birthday Bash or a similar cut. (Click here to read more about it). I don't own Birthday Bash, so I used an image from Cricut Cartridge Simply Charmed.


It's a gate-fold card...


 and the inside...


Finished card: 4 1/4" x 5 1/2"

Materials:
Cardstock: Green, Yellow, Red, Light Purple and Patterned Paper.
Cricut Cartridge Simply Charmed Birthday Cake page 74 (Base, Layer 1, Layer 2, Layer 3, Layer 4, Word and Shift Word)
Cricut Design Studio
Cuttlebug Embossing Folder D'vine Swirls
Mrs Grossman's Clear Stickers Balloons
Sentiment is Computer Printed
3D-Dots (Cake and Sentiment)

I thought I would try a gate-fold card in the other direction from what I usually make. Basically, because I wanted the "Happy Birthday" to be large and it just fit better this way.

I'm not sure why, but birthday cards are difficult for me to make. I think because there are so many directions you can go... feminine, lacy, flowery, cute, funny, etc. I always have trouble narrowing it down (unless I have someone specific in mind). I enjoyed this challenge...the first thing I did was ask my son, "What is the first thing you think of when I say 'birthday'?" "Cake," was his immediate response. My oldest said the same thing (lol). So that's how this card came about.

Thanks for stopping by. I would love to hear from you...so leave a comment. Become a follower. Challenges are fun to try cause you never know...just imagine what you could do......

Wednesday, January 12, 2011

Crop Stop Challenge # 1 Sketch

Second post for today.and I'm cutting this really close. Deadline for this challenge is tonight at midnight. I happen to run across this blog, Crop Stop, (click here to check it out), late last night. I worked extra hours today, so I didn't get a chance to even start this until tonight after dinner. It's based on a sketch.


Here is what I came up with:

The sentiment (Happy Valentine's Day) is in silver pigment ink (it may be hard to see). The silver is so hard to phototgraph for you to see.

There are silver stamped hearts on the side panel (again it may be hard to see). I guess this would be considered a version of a "Joy Fold Card". 

Finished Card: 4 1/4" x 5 1/2"

Materials:
Cardstock: White, Pink, Three Different Patterned Papers
Sizzix Textured Impressions Embossing Folders 5PK - Wedding Set #2  Scrollmark
Inkadinkado Happy Everything Stamps Happy Valentine's Day
Making Memories Stickers 7/16" Dot Silver "i" and "u"
Colorbok Metal Accents Hearts
EK Success Sticko Dimensional Stickers Lovely Hearts
Silver Pigment Ink
Three Red Rhinstones

Hope you like the card. It was fun to make. Just hoping I make the deadline. Thanks. Leave a comment. 
Push yourself to the limit...just imagine what you could do

Papercraft Star Challenge #28 Liz Chidester Sketch

This week at Papercraft Star the challenge is a sketch.


I was inspired to make a Valentine's Day card.


Finished card: 4 1/4"x 5 1/2"

Materials:
Cardstock: White, Red, Patterned Paper, and Red Embossed Cardstock
Cricut Cartridge Lyrical Letters "B" page 29 (Shift Loop Dee Loo), Love U (Heart) page 71 (Shift Loop Dee Loo)
Martha Stewart Deep Edge Punch Garden Trellis
EK Success Corner Rounder Punch
EK Success Sticko Dimensional Sticker (Pink Heart)
Red Ribbon
Red Pigment Ink
3D-Dots

The sentiment "Be my Valentine", minus the "B", was printed from my computer. I think the heart on the inside finishes off the card.

Now here is a story for you: I happen to be using Design Studio (not absolutely necessary to use, that's why I didn't list it) when I made the "B". I finished the front of the card but thought it just didn't look "done". I happened to glance at my computer screen and Design Studio with the Lyrical Letters Cartridge was still there. I saw the heart and decided that was what the inside needed. So, I used Design Studio, resized the heart and cut it out. When I went to write it up in the materials list, I went to the handbook to find out the page and such, but I couldn't find the heart. I kept looking and looking but nothing. So I went back to my computer and thank goodness, I hadn't changed the screen. There it was...bottom row 4th button in. Again, I went back to the handbook and finally I found it...this small itty bitty heart in the far corner. No wonder I kept missing it. My lesson to all of you: Look carefully through your handbooks because there just might be an image in there that you didn't know existed and it could just be what you need to finish your project. I know I'll be looking closer from now on.

Hope you like the card. I would love to hear from you. Leave me a comment...become a follower (even better)...now get inspired...imagine what you could do

Tuesday, January 11, 2011

Fantabulous Cricut Challenge #42 Winter Warmies

This is my card for Fantabulous Cricut Challenge this week. These are the instructions:


Challenge #42 Winter Warmies
Create using some type of winter clothing/accessory on your project (i.e.: mitten, sweater, hat etc.)


Well, as you can see, I have Valentine's Day on the brain. (Thought it came out cute).

Finished Card: 4 1/4" x 5 1/2"

Materials:
Cardstock: White, Black, Pink, Dark Red, Dark Brown, Medium Brown, Tan and Patterned Paper
Cricut Cartridge Create A Critter Squirrel page 32 (Base, Layer 1, Layer 2, Layer 3), Nuts (Accessory and Shift Accessory), "nuts about u" (Phrase)
Cricut Cartridge Mickey Font "I" and "m"
Cricut Cartridge Everyday Paper Dolls Winter B (Hat and Gloves) page 36 (Shift Headwear, Shift Accessories 1)
Cricut Design Studio
Cuttlebug Embossing Folder Heart Blocks
Doodlebug Design Crushed Velvet Flock White
Martha Stewart Tinsel Glitter Crystal
Colorbok Metal Accents Hearts
Computer Printed Sentiment "Happy Valentine's Day"

Hope you like the card. Would love to hear from you...leave a comment. Thanks.
Get inspired...try a challenge, imagine what you could do (you might me surprised!)

Friday, January 7, 2011

Glitter and Packing Tape Card #2

Yesterday I posted two (2) cards and had said that I was going to play around to see if I could find any other images that would work with the packing tape and glitter technique. Well, I did. I found one on Cricut Cartridge Paper Lace that I thought would work. I used Cricut Design Studio in order to make it into a card. Here it is:


and the inside:


Finished Card: 4 1/2" x 5 "

Materials:
Cardstock: Blue and Light Teal
Cricut Cartridge Paper Lace Blossom 2 page 32 (Base)
Cricut Cartridge George and Basic Shapes
Cricut Design Studio
Martha Stewart Glitter Turquoise
Sizzix Embossing Folder Plaid
Cuttlebug Embossing Folder D'Vine Swirls
Packing Tape
Button

I like the effect of the two different embossing folders. Since I didn't add a sentiment on the front, I figured that I could add one to the inside (depending on what occasion I wanted to use it for).

These are really fun to make. I'm going to play around some more and see what other images that will work. Thanks for stopping by and let me know what you think. It's amazing what you can find on your cartridges that you didn't even know was there...I did, now imagine what you could do.....

Thursday, January 6, 2011

Glitter and Snowflakes

In November 2009, Joy from Everyday Cricut (formally Christmas with the Cricut) posted a card that I always liked. (Click here to see it). I finally took some time and made a version of it


and


and the inside (hopefully you can see the embossing cause I think it adds a little something to the card).

(The pictures don't really show the transparency of the design, which is so pretty). I intentionally left the inside blank so I could write a note.

Finished card: 4 1/2" x 5 "

Materials:
Cardstock: White and Purple
Cricut Cartridge Winter Woodland Snowflake 4 page 35 (Card), "Peace" page 75 (Card), "Snowy" page 79 (Card) and "Wishes" page 80 (Card)
Cricut Cartridge George and Basic Shapes (Circle welded inside of a Square)
Cricut Design Studio
Sizzix Embossing Folder Snowflakes
Clear Packing Tape
Martha Stewart Glitter Charoite and Kunzite
Rhinestones

I cut the card and words on Design Studio. Next, I put the packing tape on the back of the snowflake design then sprinkled glitter over the front where it is sticky. (Work on a craft mat when placing the packing tape on the back so it doesn't stick. Keep your fingers off the sticky part also or the glitter won't adhere). Glitter the words and glue to the front. Attach the Square with the circle cut out on the back of the snowflake design. Emboss card with the Sizzix Snowflake folder. Add Rhinestone.

I would like to make these with all the different colors from the Martha Stewart Glitter. I think they would be really pretty.

I also submitted this to The Paper Variety Challenge "Snowflakes" Click here.

I was playing around with different shapes but I can't seem to get it to work. I'll have to keep playing, I guess. Hope you like my version...would love to hear from you...leave a comment...just imagine what you could do.....

Wednesday, January 5, 2011

Papercraft Star Challenge # 27 New Year's Resolution Project

This is my first Papercraft Star Challenge for 2011. Here are the directions:
Make a card, layout, altered item, gift or home decor project using one of your New Year's Resolutions as your inspiration. Be sure to include the New Year's Resolution as part of your project description on your blog!

My resolution: To try new products and techniques that I am not familiar with in my crafting.

In some of the supplies my friend gave me the other day were some products that I have never used. So, I thought this would be a perfect time to try one of them. This is the card that I made:


and the inside:


Finished card: 4 1/2" x 5 1/2".

Materials:
Cardstock: White, Pink and Teal
Cuttlebug Embossing Folder Tinkerbell
Lumin Arte Twinkling H2O's Moss Agate, Mediterranean Blue, Lemongrass and Deep Coral
Martha Stewart Glitter Aquamarine Crystal
Doodlebug Design Crushed Velvet Flock Yellow
Cri-Kits Metallic Teal
Cricut Cartridge Opposites Attract
Cricut Design Studio
Two (2) Pom Poms
ColorBox Petal Point Pigment Option Pad Mist Medium Teal

I have never used the Twinkling H2O's. They are shimmering watercolors. I like the effect that they have, although I think I need to practice with them a little more (but I don't think I did too bad for the first time).
I don't see myself using them all the time, but I can see using them for certain effects. What do you think?  Have you ever used the H2O's? Leave me a comment. I would love to hear from you. Thanks.

I tried to go outside my comfort zone...you should too...imagine what you could do......

Monday, January 3, 2011

Fantabulous Cricut Challenge Me Monday #41 Snowy Delights

A friend of mine gave me some crafting supplies and I wanted to say "Thank You". I saw this challenge and I thought I would combine the two. This is the card I came up with:


Finished card: 5" x 5"

Materials:
Cardstock: Pink (2 shades), White, Black, Gold and Red
Cricut Cartridge Simply Charmed Penguin 2 page 66 (Shift Base, Shift Layer 1, Shift Layer 2,  Shift Layer 4)
Martha Stewart Punch Around The Page Combo-Aspen
Sizzix Embossing Folder Snowflakes
Studio G Clear Stamps Thank You
Black Embossing Powder
Doodlebug Design Inc. Crushed Velvet Flock-Red
Pink Ribbon
Googly Eyes
3D-Dots

Here is the inside: (Sentiment was printed on my computer)


I hope that she likes my card. I truly appreciate what she did. I can't wait to start playing. Thanks Patti.

Take some time, and create...just imagine what you could do..................

Saturday, January 1, 2011

HAPPY NEW YEAR Card


Wishing you a very Happy New Year.

Finished card: 5" x 5"

Materials:
Cardstock: White, Green (2 shades), Fushia Foil, Silver Foil and Gold Foil
Cricut Cartridge Simply Charmed Champagne2 Page 71 (Shift Base, Shift Layer 1)
Cricut Cartridge Wild Card Happy New Year Page 78 (Base Phrase)
Sizzix Embossing Folder Scallops
Martha Stewart Tinsel Florentine Gold

The only thing I would add to this if I were to send it out would be the year in the top corner. I think that would actually finish it.

Have a great rest of the day....and maybe, if you are up to it, start the year off right and craft a little...cause just imagine what you could do......Happy New Year!
Related Posts with Thumbnails